Do you have scores of emails in your inbox spanning the last decade? Or something close? Do you start to feel anxiety every time you open your inbox because there are so many emails? Do emails that don’t get answered immediately sink into the swamp that is your inbox?
This blog post is for you! First create archive folders for the old stuff. Decide what outdated set of old emails you don’t need to deal with. It might be last years emails or emails older than this month. Sort emails by date, create a folder/folders for the archives and drag and drop all the emails that belong in the archive folder/folders. If you need to find something in the archive folders later, you can use the Outlook search functionality.
Ok, now you are only dealing with semi-current emails. This is where ClearContext really shines because of its awesome one click filing and email processing functionality. Go through each email from top of your inbox to bottom and decide what to do with it. If action is needed, do the action now, create a task or appointment from the email, delegate it, or defer it out of your Inbox for later. Next either delete the email if no longer needed, or file it with the awesome one click ClearContext File button. The File button will suggest a folder based upon where you have filed similar messages to in the past. Or you can select a different new or existing folder by clicking the down arrow. You can even file whole conversations with one click and have the option to automatically file the original message while responding to or using ClearContext actions on an email.
ClearContext one click filing and email processing is pretty nifty and it will have you on your way to inbox zero in no time.
Posted by ClearContext at 10:29 am on May 9th, 2016.
Categories: clearcontext, daily_workflow, manage, tips.
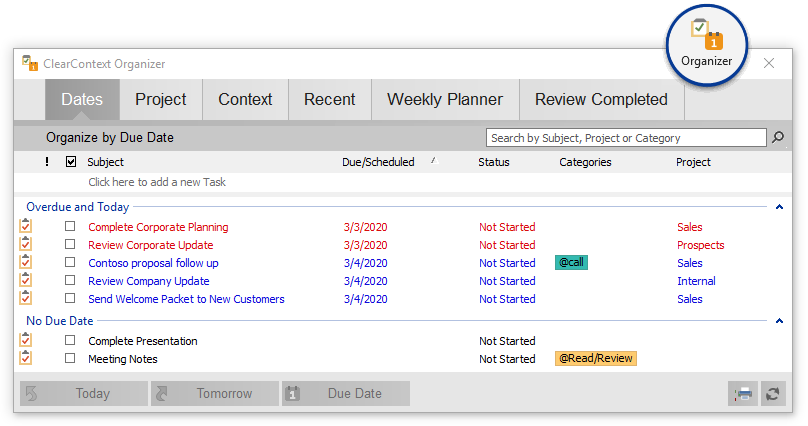
v5.3 adds the ability to quickly add tasks from the Organizer. Create new tasks on the fly via the Add Task box at the bottom of the window of the pane. Type the task subject and press ENTER to create the task with a date of today. If you have instructed ClearContext to ask for a project assignment on save, the project selector will appear. Assign a project or date via the options to the right of the Add Task text entry field. For more detail, see our User Guide.
Posted by brad at 11:24 am on February 11th, 2011.
Categories: product, tips.
There are several new enhancements to AutoFile in our v5.3.0 release. Here are a few excerpts from our User Guide on the changes.
 Domain Rule Creation
Highlight a message and press the AutoFile button on the toolbar or select AutoFile from the ClearContext menu. In the dialog that appears, choose whether you want to create a sender-based rule (i.e. bacn@bulksender.net) or a domain-based rule (i.e. bulksender.net) and select the group you would like to file to. All messages in the current folder that match your rule will be filed to the group you selected. All future messages from that sender or domain will be filed as well.
Renaming AutoFile Groups
Open ClearContext > Options > AutoFile to configure the service. Highlight a filing group and click Change Name to rename a filing group.
Posted by brad at 10:22 am on February 10th, 2011.
Categories: product, tips.
Yesterday we announced the release of v5.3.0. One of the key new features of the release is the addition of Next Actions to support GTD processing. Here’s an excerpt from our GTD setup guide on using the new features.
Next Actions
Use the ClearContext Dashboard to quickly identify your Next Actions; those tasks required to keep your projects moving forward.
 Mark Next Action
After you have processed your Inbox, view the ClearContext Dashboard in the Sidebar to see your task list by Project. If the Sidebar isn’t open, open it via the Dashboard button on the ClearContext toolbar or ClearContext menu.
From the Dashboard task list, right click a task to mark it as a Next Action. A small arrow will be added to the left of the task and a category of !Next will be added to it.
 Review Next Actions by Project
Scan the Project list in the Summary Dashboard to view your active Projects. Those projects with Next Actions assigned will have a small arrow next to the total Task count. Double-click a project without a Next Action to open it. Right click the next task required to move the project forward and mark it as a Next Action. If none of the tasks listed are an appropriate next action, quickly create a new task using the Add Task entry box above the Task list.
Work on Next Actions
 Open the Summary Dashboard to work on your Next Actions throughout the day. On the Tasks\Appts section of the of the Summary Dashboard, select Next Actions (Category: !Next) to see only tasks that have been designated !Next. This allows you to focus on those tasks that are most important to the progress of your Projects.
For more information, download our GTD Setup Guide.
Posted by brad at 9:15 am on February 9th, 2011.
Categories: gtd, tips.
As the holidays approach, I’ve got inbox triage on my mind. As we’ve mentioned before, when your Inbox is overwhelmed address your high priority messages first before moving onto your lower priority email.
This quick tutorial will allow you to build a Priority Inbox using Outlook search folders and ClearContext Pro or Personal. Open this search folder to see only those messages ClearContext has marked important.
Before you start, if you have not already done so, download and install ClearContext and allow it to prioritize your Inbox.
1. Right click Search Folders and select New Search folder:

2. Select Create a custom Search Folder:

3. Click Choose… to customize the Search folder.
4. Name it Priority Inbox.

5. Click Browse, change the folder to include the Inbox only and disable Search subfolders:

6. Click Criteria > More Choices:

Option: To view unread items only in the new folder, select Only items that are: unread in this dialog.
7. Press Categories and select CC VIP:

Option: To see messages from known senders in addition to VIPs, select CC OK here as well.
8. Press OK three times to clear the Search Folder dialogs.
9. You now have a Search Folder named Priority Inbox that shows CC VIP from your Inbox. Add it to the top Favorites pane in Outlook via right click:

Happy Holidays!
Posted by brad at 3:14 pm on December 14th, 2010.
Categories: tips.
Many corporate Exchange customers complain about their Exchange quotas. If you constantly receive the notice that your mailbox is over its size limit, follow the tips below to set up ClearContext Professional to automatically file messages to an offline PST; freeing up space in your Exchange mail file.
 If you do not already have a a local file that you want to store messages in, create one in Outlook via File > New > Outlook Data File…
- Go to ClearContext > Options and change the Default Mail File for Filing and Projects to the new data file you just created.
- Click OK to clear the dialog and restart Outlook for your changes to take effect.
- Turn on Sent Message Filing to instruct ClearContext to move sent messages from your Exchange Sent Items folder to your Project folders.
New project folders will be created in your offline mail file by default. File your messages there and they will be moved out of Exchange, freeing up needed space.
The end result: you’ll be storing most of your messages locally, in one place, for easy review and retrieval without the hassle of begging your Exchange Administrator for more space or emergency message deletion sessions to keep the mail flowing.
Posted by brad at 3:54 pm on December 13th, 2010.
Categories: tips.
 In one of our email usage surveys, we found that 2/3 of email users leave their sent messages in the Sent Items folder. It’s not surprising that so many have given up on organizing half of their correspondence given how difficult it is to file sent messages properly.
ClearContext Pro makes filing your sent messages simple. Press the “File This Email” button when composing a message. If  a project is assigned to this conversation thread, the sent message will be moved from Sent Items to the corresponding project folder. If a project hasn’t been assigned, ClearContext will ask for one before it sends.
ClearContext will remember your filing preference. You can explicitly turn send message filing on/off via ClearContext > Options > Project Options > Send and Replied Messages with Projects.
Posted by brad at 9:55 am on December 9th, 2010.
Categories: tips.
 As we prepare to take off for the US Thanksgiving holiday, here are some tips for tackling the Inbox after time off:
- Select ClearContext > Options > AutoFile > Apply to Inbox to file messages using ClearContext’s automatic rules.
- File other unimportant, informational messages by dragging email from bulk senders onto an AutoFile filing group in the sidebar. This will move all messages these senders into folders for later review. Watch a demo of this here.
- Starting with your high priority (CC VIP) messages, manage your inbox; spending a minute or two on each conversation. Delete, Reply, File, Defer, Unsubscribe or create a Task or Appointment and quickly move on.
Enjoy the vacation!
Posted by brad at 7:58 am on November 24th, 2010.
Categories: manage, tips.
The v5.1 release has introduced many new time-saving enhancements to the product. This concludes our posts of the updated User Guide.
By default in Outlook 2003 and 2007, ClearContext adds a single toolbar to the Inbox with the applications most-used functions. Add or remove buttons from this toolbar via ClearContext > Options > UI/Toolbar. This feature is not available in Outlook 2010.
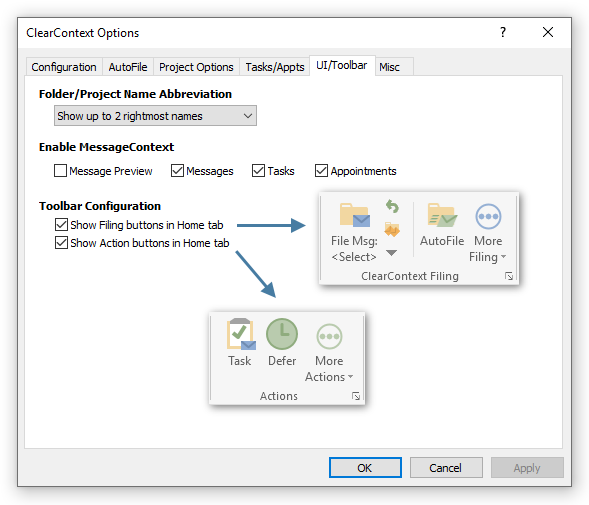
To add buttons to the toolbar, highlight the button name in the Available column and click Add. To remove, click items in theActive column and click Remove. Use the arrows below the Active field to change the order of the toolbar buttons. Reset All will put the buttons back in their factory default positions. You will need to restart Outlook for the changes to take effect.
Add a Second Toolbar
Add <START NEW TOOLBAR> to the active column to create a second toolbar. Any items that appear in the active list below <START NEW TOOLBAR> will be placed on a second toolbar. One caveat – the items marked "Drop Down Selector" must appear on the first toolbar.
Download a PDF of this User Guide here.
Posted by brad at 6:34 am on August 21st, 2010.
Categories: tips.
The v5.1 release has introduced many new time-saving enhancements to the product. We’re posting the updated User Guide over several weeks.
The Contact Exporter lets you create and export groups of email addresses found in messages stored in the Outlook folders you select.

Select the email addresses from a prioritized list of contacts generated for you to create an Outlook distribution list, Outlook contact records, or a CSV export file.
- Send a group email to people on your team – Select your work or team folder and create an Outlook distribution list.
- Create a party invitation for your friends – Select your personal correspondence folders and generate a list that you can send an email to or export to an online invitation service.
- Add all your business contacts to LinkedIn or your personal contacts to Facebook – Select the appropriate folders and create an export file you can upload.
To use the Contact Exporter:
- Go to ClearContext > Tools > Contact Exporter (Pro) from the main menu.
- Select the folders containing emails you want to export contact information from.
- The contacts found in those folders are divided into a list divided into three groups: More Relevant, Relevant, andLess Relevant. Use the selection links to select/deselect groups of those contacts or the checkboxes to individually select/deselect the contacts you want to export.
- Check the export formats you would like for the email addresses and enter names for the files – Outlook distribution list, Outlook contact records, or CSV file.
Import Contacts into Popular Websites
Once you’ve created the list, you can import these contacts into any services that accept CSV files. Here are import links for a few popular sites (log into the sites before clicking the links below):
Posted by brad at 6:32 am on August 20th, 2010.
Categories: tips.


