ClearContext v5.2.2 Available for Download
 We have released v5.2.2 to improve the email statistics included in the daily digest. Upgrade here.
We have released v5.2.2 to improve the email statistics included in the daily digest. Upgrade here.
We have updated our Activewords wordbase to support ClearContext Pro v5.2. In addition to previously released shortcuts to file, defer, unsubscribe and create tasks/appointments we have added quick access to create an AutoFile rule and mark a message important. See our Activewords partner page for more detail and a link to the download.
![]() For those of you new to ActiveWords, this powerful productivity tool adds keywords to Windows, providing a personal, portable, context free user interface with immediate response. Your words launch programs, jump to websites, send email, substitute text, search, and more. Receive information about any word or phrase in any context. Enter or select words in any context and your computer immediately delivers the results you want. Go to the ActiveWords website for additional information and a free download of the application.
For those of you new to ActiveWords, this powerful productivity tool adds keywords to Windows, providing a personal, portable, context free user interface with immediate response. Your words launch programs, jump to websites, send email, substitute text, search, and more. Receive information about any word or phrase in any context. Enter or select words in any context and your computer immediately delivers the results you want. Go to the ActiveWords website for additional information and a free download of the application.
As the holidays approach, I’ve got inbox triage on my mind. As we’ve mentioned before, when your Inbox is overwhelmed address your high priority messages first before moving onto your lower priority email.
This quick tutorial will allow you to build a Priority Inbox using Outlook search folders and ClearContext Pro or Personal. Open this search folder to see only those messages ClearContext has marked important.
Before you start, if you have not already done so, download and install ClearContext and allow it to prioritize your Inbox.
1. Right click Search Folders and select New Search folder:
![]()
2. Select Create a custom Search Folder:

3. Click Choose… to customize the Search folder.
4. Name it Priority Inbox.

5. Click Browse, change the folder to include the Inbox only and disable Search subfolders:

6. Click Criteria > More Choices:

Option: To view unread items only in the new folder, select Only items that are: unread in this dialog.
7. Press Categories and select CC VIP:

Option: To see messages from known senders in addition to VIPs, select CC OK here as well.
8. Press OK three times to clear the Search Folder dialogs.
9. You now have a Search Folder named Priority Inbox that shows CC VIP from your Inbox. Add it to the top Favorites pane in Outlook via right click:

Happy Holidays!
Many corporate Exchange customers complain about their Exchange quotas. If you constantly receive the notice that your mailbox is over its size limit, follow the tips below to set up ClearContext Professional to automatically file messages to an offline PST; freeing up space in your Exchange mail file.
 If you do not already have a a local file that you want to store messages in, create one in Outlook via File > New > Outlook Data File…
New project folders will be created in your offline mail file by default. File your messages there and they will be moved out of Exchange, freeing up needed space.
The end result: you’ll be storing most of your messages locally, in one place, for easy review and retrieval without the hassle of begging your Exchange Administrator for more space or emergency message deletion sessions to keep the mail flowing.
 In one of our email usage surveys, we found that 2/3 of email users leave their sent messages in the Sent Items folder. It’s not surprising that so many have given up on organizing half of their correspondence given how difficult it is to file sent messages properly.
ClearContext Pro makes filing your sent messages simple. Press the “File This Email” button when composing a message. If  a project is assigned to this conversation thread, the sent message will be moved from Sent Items to the corresponding project folder. If a project hasn’t been assigned, ClearContext will ask for one before it sends.
ClearContext will remember your filing preference. You can explicitly turn send message filing on/off via ClearContext > Options > Project Options > Send and Replied Messages with Projects.
 The Gmail team reports the following on their Priority Inbox feature:
“Looking at median time in conversation view, we noticed that typical Priority Inbox users spend 43% more time reading important mail compared to unimportant, and 15% less time reading email overall as compared to Gmail users who don’t use Priority Inbox.
If you haven’t given it a try yet, use ClearContext’s Mark Important feature in v5.2 to achieve similar results in Outlook.
We have released a minor update – v5.2.1 – with a few installer enhancements. To update to the latest, download here.
 Dave Johnson at BNET had this to say about ClearContext Personal:
“Here’s a tool that can help you take back control of your inbox, automatically, without setting up lots of rules or filters. The amazing thing? It actually works.”
Simon Mackie at Web Worker Daily writes:
“It automatically files unimportant emails, like social network notifications, newsletters, e-commerce emails, and other automated “bacn”, into categorized groups, taking it out of your inbox.”
For more information on the new release, see our announcement:
“ClearContext Personal makes that information easier to deal with by doing three things:
- Automatically filing unimportant messages out of your inbox to deal with later
- Creating a daily digest of all autofiled email, so you never lose any information
- Highlighting email from important senders in your inbox without any confusing rules or training
In the contact analysis process performed during setup, ClearContext’s prioritization algorithm automatically identifies those contacts that you email the most and marks them as important. ClearContext uses this contact priority to highlight emails in the Inbox from your most valued contacts. Manually mark email important via the Mark Important button on the toolbar.
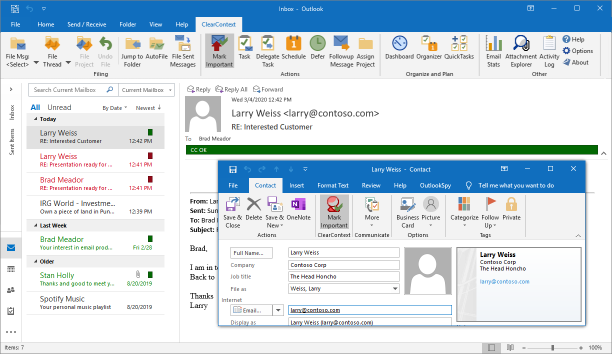
 During initial setup, ClearContext analyzes email history to determine email addresses from which you send and receive the most email. Using this information, your VIP contacts are marked as important. By default, email received from these contacts are marked with category CC VIP and color-coded red. Manually mark/un-mark a message as a VIP using the Mark Important button. This will automatically adjust the contact priority and future messages will reflect the change.
All messages from known senders are marked with category CC OK and color-coded green. These include messages from contacts that are in your address book – but not marked important – and messages from contacts that are not in your address book but are replying to conversations that you have already participated in.
 Also adjust priority via contact records. Open the contact for an important sender and press Mark Important. All future messages from this sender will be designated CC VIP.
In Outlook 2007 and later, ClearContext color codes messages using Inbox category colors. In Outlook 2003, ClearContext changes the font color to indicate priority. To see font color coding in other versions of Outlook, select a ClearContext view from the Outlook view menu (View > Current View). There are three views installed during setup:
If you change options below, the views above may no longer color code by priority.