AutoFile automatically moves incoming "bacn" email – including newsletters, social networking notifications, shopping email, etc. – to categorized folders. AutoFile comes pre-configured with filing rules for common automated email and is updated over time. You can also create your own AutoFile rules.
AutoFile Rules
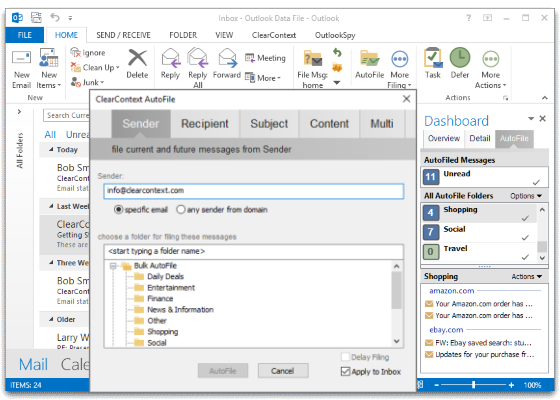
AutoFile Rules AutoFile comes pre-configured with filing rules for common senders of automated email. These rules are updated over time as ClearContext users idenitify new senders. Create your own custom AutoFile rules in one of two ways:
Highlight a message and press the AutoFile button on the toolbar or select AutoFile from the ClearContext menu. In the dialog that appears, select the group you would like to file to. All messages in the current folder will be filed to the group you selected. All future messages from that sender will be filed as well.
Click and drag a message onto a filing group in the Sidebar. Select Move on the dialog. As above, all current and future messages from this sender will be moved to the AutoFile filing group.
See below for AutoFile rule configuration options.
AutoFile Sidebar
The AutoFile tab on the ClearContext Sidebar provides a tool to view and manage these emails.
AutoFiled Messages
The top section of the AutoFile tab shows a count of all unread messages across all AutoFile groups:
Click on Unread to view all AutoFiled, unread messages.
Toggle the Filing Group view between All Groups and groups with Unread only via Options.
Select Options > Rules and Settings to configure AutoFile.
Select Options > New Filing Group to create a custom group for use with AutoFile. This feature is available for Pro only.
Filing Groups
Open the AutoFile tab on the ClearContext Dashboard to see an unread count of messages filed by group (Shopping, Social, Travel, etc.). From here:
Click on a filing group to see unread, AutoFiled messages for that group.
Double-click a filing group to open the folder that it moves messages to.
Click the check mark on the filing group to mark all messages in the group as read.
Right click a group to disable/enable filing to it. Open View AutoFile Group Details from the right click menu to manage the filing rules for the individual group.
Unread Messages
The message list at the bottom of AutoFile tab shows all unread email for the chosen group. Messages are grouped by sender. You can act on individual messages via the Actions or right-click menus:
Mark Read messages that you no longer wish to see in the list.
Delete messages that you do not want to keep.
Select Actions > Jump to Folder to open the folder that contains the current message.
Select Stop Filing for messages that you no longer want to AutoFile.
AutoFile Options
Open ClearContext > Options > AutoFile to configure the service. The following options are available:
Create Daily Digest message in Inbox directs ClearContext to place a summary of all AutoFiled messages in the Inbox once/day.
Check Allow automatic updating and sharing of rules to periodically download new AutoFile rules for automated senders. When enabled, this will send the custom AutoFile rules that you create to ClearContext so that new bulk senders can be identified.
Enable/Disable individual Filing Groups in the bottom half of the options dialog.
Double-click a filing group or highlight and click Open Details to see the rules designated for the selected group. Turn off individual rules from this dialog.
Press Apply to Inbox to apply all currently enabled AutoFile rules to your Inbox. This is especially useful after an AutoFile rule update.
Daily Digest
The Daily Digest is sent to your Inbox once/day and lists all messages filed over the last 24 hours. Use this message to ensure that you don’t miss an important AutoFiled email. Click on a filing group to jump to the folder that contains the filed messages. The Daily Digest also provides some email usage and responsiveness statistics for the last 24 hours. Disable the Daily Digest via ClearContext > Options > AutoFile.
As we prepare to take off for the US Thanksgiving holiday, here are some tips for tackling the Inbox after time off:
Select ClearContext > Options > AutoFile > Apply to Inbox to file messages using ClearContext’s automatic rules.
File other unimportant, informational messages by dragging email from bulk senders onto an AutoFile filing group in the sidebar. This will move all messages these senders into folders for later review. Watch a demo of this here.
Starting with your high priority (CC VIP) messages, manage your inbox; spending a minute or two on each conversation. Delete, Reply, File, Defer, Unsubscribe or create a Task or Appointment and quickly move on.
At ClearContext, our vision is to organize all the information that flows through email. But with the ever-increasing flood of unimportant email, many people are too overwhelmed to even get started. So we’ve created ClearContext Personal, a free product to help Outlook users get their inbox under control and see the email that really matters.
Everyone complains about getting too much email, when in reality most of us simply get too much unimportant email and don’t have useful tools to deal with it. People try all kinds of systems to deal with the glut of messages from social networks, newsletters and ecommerce sites, but trying to manage folders, labels and multiple accounts fails over time for many people because it is too much work. The result is that people spend too much time dealing with messages that aren’t important.
ClearContext Personal makes that information easier to deal with by doing three things:
Automatically filing unimportant messages out of your inbox to deal with later
Creating a daily digest of all autofiled email, so you never lose any information
Highlighting email from important senders in your inbox without any confusing rules or training
We’re not the only ones to recognize the huge challenge people face dealing with all these messages. Gmail created Priority Inbox to try and tackle the issue. And in their new messaging platform, Facebook acknowledges the problem by separating mail into two inboxes – one for messages from your friends and another for all other messages.
Today, ClearContext brings that type of next-generation inbox functionality to the hundreds of millions of Outlook users facing similar problems with email. With ClearContext Personal, we’ve focused on making everything clear and easy to understand for the user. “Bacn” emails such as newsletters and notifications are automatically separated into “AutoFiled” folders – and organized into categories like Travel, Social, Shopping, etc. And simply hit the “Important” button to have all email from specific people highlighted as VIP emails. No complicated rules or configuration, just install and the AutoFile service will regularly update with new rules to automatically file and categorize email – so you can focus on the important emails in your inbox.
And for users that would like to also manage all of their email, tasks, appointments, files, and contacts into projects in Outlook, try a free 30-day trial of ClearContext Pro
We’re very excited to announce that ClearContext Pro v5.2 is now available for download. ClearContext 5.2 introduces a completely new module to automatically filter and manage all the “bacn” newsletter and notification emails you receive.
AutoFile
Automated emails (notifications, newsletters, coupons, etc) are now automatically categorized and filed for you. The AutoFile service regularly updates with new rules to manage unimportant email.
A new AutoFile tab in the ClearContext sidebar lets you quickly review and manage all your AutoFiled messages, and the Daily Digest provides a summary of AutoFiled messages so you don’t have to worry about losing any information.
When upgrading from v5.1 or earlier AutoFile is enabled by default, including sharing AutoFile rules you create and downloading updates. Adjust these settings in ClearContext > Options > AutoFile.
Other Features
A number of minor enhancements have been made to increase the flexibility of the ClearContext Dashboard and Task Organizer functionality. These include support for people who organize by start date and undated tasks, as well as subproject and optional appointment views in the Organizer Review tab.
The Contra Costa Times ran a story by Laura Casey on the supposed death of e-mail. ClearContext CEO Deva Hazarika is quoted:
In fact, e-mail is only becoming more important for working professionals, says Deva Hazarika of ClearContext of San Francisco, a software company that helps people organize all the information that flows through e-mail.
…
"People need information to be traceable. They need to look back at information. That’s why all of important conversations are pretty much staying with e-mail right now," Hazarika says. "E-mail is really not only sticking around, but it’s getting entrenched. It’s really the one place where I can reliably send (information like receipts from Amazon or business) communication to you."
Use the MessageContext to see emails, appointments and other related tasks to get the full context for the item you are working on.
By completing the Identify and Manage steps previously, you are free to focus on the work that is most important to you while staying in control of your Inbox.
Tip
Only touch your high priority messages once. Even though you are glancing at these messages throughout the day, make sure that you act on any email you open.
For additional tips for using the ClearContext Daily Workflow, see the following blog posts:
After you have identified the day’s priorities, twice daily (or other specified interval based on email response time requirements), starting with your highest priority email first, quickly act on each Inbox message or determine when you want to act on it:
Act Immediately?
Reply to the message if you can do so in a minute or two.
Delegate the email to someone else as appropriate.
The v5.1 release has introduced many new time-saving enhancements to the product. This concludes our posts of the updated User Guide.
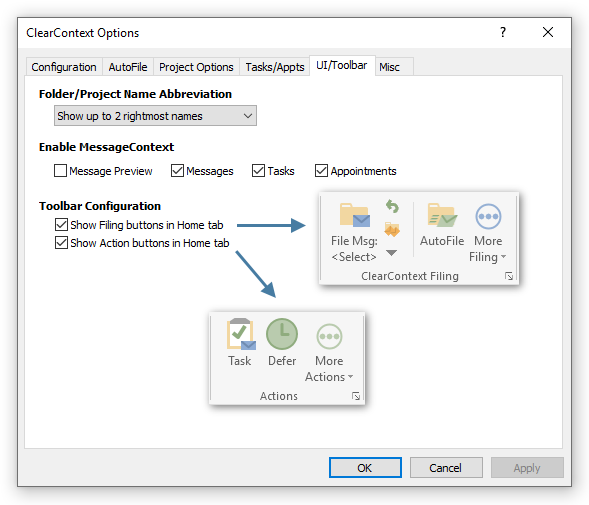
By default in Outlook 2003 and 2007, ClearContext adds a single toolbar to the Inbox with the applications most-used functions. Add or remove buttons from this toolbar via ClearContext > Options > UI/Toolbar. This feature is not available in Outlook 2010.
To add buttons to the toolbar, highlight the button name in the Available column and click Add. To remove, click items in theActive column and click Remove. Use the arrows below the Active field to change the order of the toolbar buttons. Reset All will put the buttons back in their factory default positions. You will need to restart Outlook for the changes to take effect.
Add a Second Toolbar
Add <START NEW TOOLBAR> to the active column to create a second toolbar. Any items that appear in the active list below <START NEW TOOLBAR> will be placed on a second toolbar. One caveat – the items marked "Drop Down Selector" must appear on the first toolbar.
The v5.1 release has introduced many new time-saving enhancements to the product. We’re posting the updated User Guide over several weeks.
The Contact Exporter lets you create and export groups of email addresses found in messages stored in the Outlook folders you select.
Select the email addresses from a prioritized list of contacts generated for you to create an Outlook distribution list, Outlook contact records, or a CSV export file.
Send a group email to people on your team – Select your work or team folder and create an Outlook distribution list.
Create a party invitationfor your friends – Select your personal correspondence folders and generate a list that you can send an email to or export to an online invitation service.
Add all your business contacts to LinkedIn or your personal contacts to Facebook – Select the appropriate folders and create an export file you can upload.
To use the Contact Exporter:
Go to ClearContext > Tools > Contact Exporter (Pro) from the main menu.
Select the folders containing emails you want to export contact information from.
The contacts found in those folders are divided into a list divided into three groups: More Relevant, Relevant, andLess Relevant. Use the selection links to select/deselect groups of those contacts or the checkboxes to individually select/deselect the contacts you want to export.
Check the export formats you would like for the email addresses and enter names for the files – Outlook distribution list, Outlook contact records, or CSV file.
Import Contacts into Popular Websites
Once you’ve created the list, you can import these contacts into any services that accept CSV files. Here are import links for a few popular sites (log into the sites before clicking the links below):
 AutoFile Rules AutoFile comes pre-configured with filing rules for common senders of automated email. These rules are updated over time as ClearContext users idenitify new senders. Create your own custom AutoFile rules in one of two ways:
 The top section of the AutoFile tab shows a count of all unread messages across all AutoFile groups:
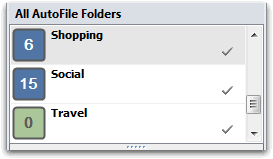 Open the AutoFile tab on the ClearContext Dashboard to see an unread count of messages filed by group (Shopping, Social, Travel, etc.). From here:
 The message list at the bottom of AutoFile tab shows all unread email for the chosen group. Messages are grouped by sender. You can act on individual messages via the Actions or right-click menus:
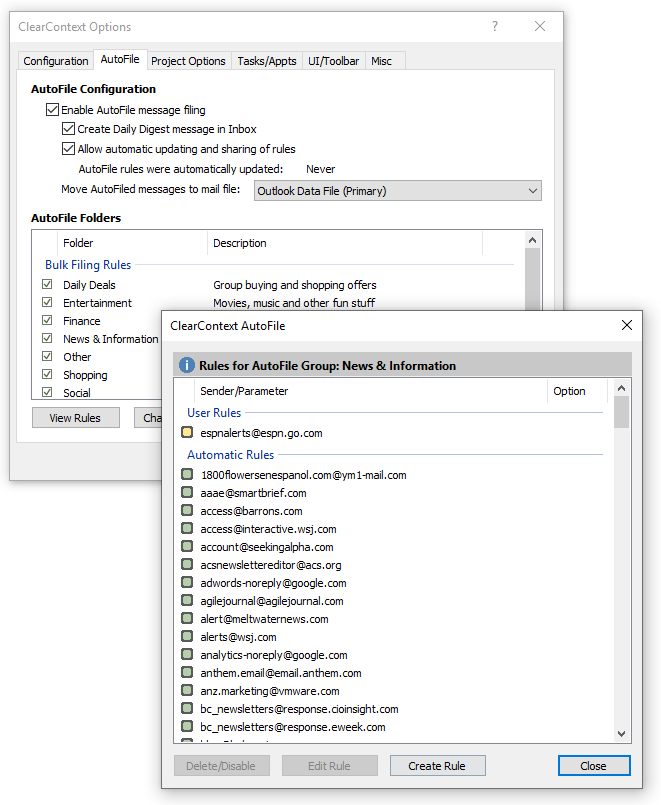
 Daily Digest
  As we prepare to take off for the US Thanksgiving holiday, here are some tips for tackling the Inbox after time off: