Posts from July 2010.

User Guide: Followup – Remind Yourself to Check on the Status of a Message

The v5.1 release has introduced many new time-saving enhancements to the product.  We’re posting the updatedUser Guide over the next few weeks.

With Followup Msg, quickly and easily create automated reminders of important email responses that you are expecting.

Automated Outlook Reply Reminder

As you send email, Followup Msg will create a task to remind you if you have not received a response in a designated amount of time. As you compose a message, click the Followup Msg button and select the time period for your reminder. Choose from the following completion options:

  • Cancel the reminder task when you receive a new message in the conversation, regardless of sender
  • Cancel the reminder task when you receive a new message in the conversation from a specific sender
  • Never cancel the reminder task, regardless of whether you receive further correspondence in the conversation or not

When you send the message, a task with the message subject and the prefix "Followup:" will be created in your tasks list. It will remind you of the follow-up at the time you chose. Enable/Disable the task reminder from the options screen.

To assign a specific status or category to the followup task, assign Followup Initial Status as you create the follow up.

You can also create a Follow-Up task for any message conversation at any time by highlighting the message within Outlook and selecting ClearContext > FollowUp Message from the ClearContext menu.

Quick Options

Followup Quick Options

When creating a follow-up from a composed message, click the top half of the button to open the options dialog.  Alternatively, click the arrow to quickly create a follow-up using one of the options provided (1 day, 2 days, etc.).  Once a follow-up has been created for the current message, the button will remain highlighted.

Multiple Addresses

Specify multiple addresses in the "Once I receive a response to this message conversation from a specific email address" field by separating them with a semi-colon. If you receive a response from any of the addresses in that field, the task will be automatically marked as complete

User Guide: Defer – Hide Inbox Messages Until You Are Ready to Deal with Them

The v5.1 release has introduced many new time-saving enhancements to the product.  We’re posting the updatedUser Guide over the next few weeks.

Much like you can snooze tasks and appointments in Outlook, Defer allows you to snooze a message for a given duration. When you click Defer, ClearContext moves the message into a special, dated deferred folder and automatically pulls it back into the Inbox, unread, at the time of your choosing.

Defer Outlook Email

Highlight a message you want to postpone and click the Defer button. You can choose to defer for a number of minutes/ hours/ days/ weeks/ months or choose a specific date and time. ClearContext will move the message into a dated ClearContext Deferred folder (a sub-folder of the Inbox). At the chosen time, the message will re-appear unread in the Inbox. Alternatively, click on one of the ClearContext Deferred dated folders to view upcoming messages. You can defer a message as many times as you want.

Quick Defer Options (Outlook 2007 Only)


In the ClearContext Outlook 2007 ribbon, quick defer options are provided to bypass opening of the Defer Options dialog. Select the arrow in the Defer combo box to quickly defer a message for 1 hour, 1 day, 2 days, etc..

Defer Tips

The Defer reminder time defaults to the task reminder time you have set in native Outlook (usually 8 AM). To change, go to Tools > Options > Task Optionsand change the reminder time in the Tasks subsection.

Tutorial: For more detail on this and other concepts, watch our Getting Started Tutorial.

User Guide: Unsubscribe from Thread – Remove Unwanted Conversations from the Inbox

The v5.1 release has introduced many new time-saving enhancements to the product.  We’re posting the updatedUser Guide over the next few weeks.

Unsubscribe from Thread allows you to remove all current and future messages in a conversation out of the Inbox so that they don’t clutter your Inbox.

IMS User Guide: Unsubscribe from Message Threads

When copied on a long email thread that you have no interest in (i.e. joke threads, happy hour planning, etc.), highlight a message from the thread, click Unsubscribe, and all Inbox messages from that conversation will be automatically moved to the ClearContext Unsubscribed folder (a sub-folder of Inbox). All future messages that you receive from the same conversation will automatically be moved to this folder as well. To re-subscribe to the thread, go to the ClearContext Unsubscribed folder, highlight a message from the thread, click Unsubscribe, and future messages you receive will stay in the Inbox.

Unsubscribe to Project Folders

If a Project is assigned to the current thread, ClearContext can send unsubscribed messages to Project folders rather than the ClearContext Unsubscribed folder. To turn this option on, go to ClearContext > Options > Project Options and check "File unsubscribed messages with a Project to the Project Folder."


Tutorial: For more detail on this and other concepts, watch our Getting Started Tutorial.

User Guide: Filing – Quickly File to Suggested Folders

The v5.1 release has introduced many new time-saving enhancements to the product.  We’re posting the updated User Guide over the next few weeks.

ClearContext automates the filing process, making it easier to identify and store messages by remembering where you previously filed email.

project selector

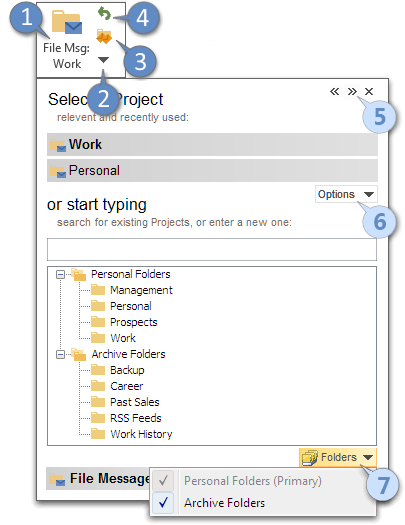
1. File Msg files email to the listed folder

File Message to Folder indicates that you previously filed messages in this conversation. File Suggestion indicates that this is a suggested folder. Shortcut Key: Alt-M

2. Press to see other filing choices

File to other folder opens other choices in the Project selector.  Select a recently used folder or start typing to filter the full folder list.  Hide or add additional suggestions using the links in the selector.  Shortcut Key: CTRL-ALT-M

3. Thread files the entire conversation

File all messages from this conversation thread into the folder listed on the File Msg button.  Press File to other folder to see other choices.

4. Undo the last message filed

If you accidentally filed a message, Undo will return it to the current folder

* File Original or Delete Original as you reply

File Original

Enable File under Original Message when replying. The message you are replying to will be automatically filed to the Project folder you assign.  ClearContext remembers this setting.

Delete works the same way, deleting the message you are replying to.  This setting is not remembered.  Enable ClearContext to delete all unassigned, non-Project messages as you reply via ClearContext > Options > Misc.

* File This Email files the message you are sending

File Original

Enable File This Email when sending email. The message you are sending will be automatically filed to the Project folder assigned.  ClearContext remembers this setting.

File Original* File Project files all messages in the current Project

Highlight a message with a Project assigned to it and select File Project from the ClearContext menu.  All messages in the current folder with this Project assigned to it will be filed.  This button can be added to the toolbar.

* Jump To Folder opens a project folder

Select Jump to Folder from the ClearContext menu to quickly open a folder.  This button can be added to the toolbar.

Options

5. Expand the Project selector

Press the right arrow to expand the selector and see suggestions in two columns.

6. Change the number of suggestions

Click the links to show more or less suggestions

7. Add/remove available mail files

Click Mail Files to add or remove available data stores.  Go to ClearContext > Options > Configuration to add Public Folders and SharePoint Lists.  Designate a Personal Folders file as your primary here as well.  If all of your folders reside under a single folder (i.e. sub-folders of the Inbox) designate the Root folder for Filing and Projects here (i.e. /Inbox).

* One-click filing

Disable one-click filing

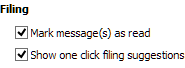
When you disable one-click filing via ClearContext > Options > UI/Toolbar, ClearContext only shows a project in the File Msg button when previous messages in that conversation have been filed.

* Assign Project

To assign a project without filing, select Assign Project from the ClearContext menu.  Add this button to the toolbar via ClearContext > Options > UI/Toolbar.  You can also remove a project assignment with this button.

* Sent Message Filing

Save sent messages to project folders

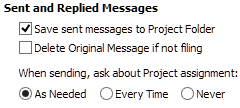
Enable Save messages to Project Folder at ClearContext > Options > Project Options to automatically move sent messages to project folders as you send.  You can also enable this feature by selecting File This Message as you send email.

* When messages are moved to a Project

Assign project when messages are moved

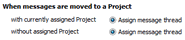
By default, ClearContext monitors projects folders and assigns that project to email conversations when messages appear there.  Configure this behavior at ClearContext > Options > Projects Options.

* Category Synchronization

project to category synchronization

By default, ClearContext writes the Project name to the message Category field with Brackets around it.  Turn this on/off and change options in Project Options.

* Single Folder Filing

project to category synchronization

To file all messages to a single folder instead of individual project folders, select File all messages to root folder in Project Options.  When you press any Filing button, ClearContext will assign the Project Category to the message and move it to the folder you specify.

Tutorial

Outlook plugin to organize and file email

See our filing tutorial for additional info.

Filing Tips

Multi-level Projects: To create multi-level projects, enter the Project names separated by a “/”. For example, “Work/Admin” would store the message in the “Admin” subfolder underneath the “Work” main folder.

New Messages: Assign a project to a new message via the Project button on the open message prior to sending. All email responses to that message will automatically include the project name. In addition, if you are utilizing the Save Sent Messages option, this new message will automatically be filed in the appropriate Project folder.

Category Delimiters: Change the Prefix and Suffix appended to Project names when duplicated in the category field via ClearContext > Options > Project Options. Leave these fields blank to remove the delimiters.

User Guide: Introduction

The v5.1 release has introduced many new time-saving enhancements to the product.  We’re posting the updated User Guide over the next few weeks.

Following installation you will note that ClearContext has has added toolbars and a sidebar within Outlook. These features allow you to quickly & effectively manage email.  For a quick introduction, we recommend stepping through our getting started page.

IMS Toolbars

The ClearContext Inbox

Immediately following setup, ClearContext is automatically prioritizing email from VIPs in red and Known Senders in green. Automated features include:

  • Inbox prioritization – ClearContext uses contact and email message information to prioritize emails.  See Contact Prioritization for more detail.
  • One-click filing – ClearContext suggests folders for filing based on email history.  Press the file button to accept the suggestion or the arrow next to it to see more suggestions.
  • Convert email to action  – Create a task or appointment from an email with a single click.  Assign projects to them and view your work by project in the Dashboard.

In addition, you will find that ClearContext has installed toolbars in the Inbox and open item windows to provide greater control over email processing. This user guide will help you take advantage of these features. For additional information on ways to use ClearContext, see our video tutorials.

Usage Tips

Mark Contacts Important

Modify Contact Priority: ClearContext highlights known senders in green and VIP senders in red. Open a contact record and press Mark Important – all future email from this contact will be marked as a VIP.

Topic

File to Projects: Projects are the cornerstone of the ClearContext organization system.  When you file a message, you are assigning a Project to that email conversation.  All future messages in this thread, along with any tasks or appointments generated from it, will be tagged with this Project.  This will allow you to use the ClearContext Dashboard to view all of your notes, tasks and appointments related to a given Project.

Download a PDF of this User Guide here.

Facebook Users and the Outlook Social Connector

I spend a significant portion of my time communicating via email with people I have never met.  Since installing the Outlook Social Connector, I’m finding out more about them than they might expect.

The Outlook Social Connector shows Facebook information in the people pane at the bottom of every email.  Depending on the individual’s Facebook privacy settings, this can include a profile picture and status updates; regardless of whether you are friends with the individual or not.  Let’s just say I’ve seen some interesting profile pictures at the bottom of some business email.

Of course, this information has always been available via search, but now it’s integrated right in the bottom of every email I receive.  So, you might want to check your privacy settings on Facebook and maybe consider cleaning up up your profile picture while you’re there.

Credit: Outlook Social Connector Team

Screenshot Credit: Outlook Social Connector Team

GTD & ClearContext: Other Useful Features

The release of v5.1 has made it easier than ever to implement GTD within Outlook.  This is the final excerpt from our GTD Setup Guide.  See Parts 1, 2, 3, 4 & 5.

Other Useful Features

In addition to the above, ClearContext provides many additional features to help you focus on your most important work and manage your email more efficiently. Here are a couple that are of particular interest to our GTD customers.

Prioritization

image

A core feature of ClearContext is the automated prioritization of individual email messages. Though email prioritization is not a core tenet of GTD email processing, ClearContext’s prioritization engine can be extremely helpful when trying to get the Inbox down to empty. When there are too many messages to process in the time available, ClearContext’s prioritized view allow you to address your most important messages first while saving the less important items for later.

Priority is determined by the sender of the email and the directness of the email (CC: vs. To:). Designate given senders as VIPs and ClearContext will use that information to prioritize the Inbox. Messages are color-coded by priority, with the most important email from the most important senders highlighted in red. In addition, as you process individual emails, manually mark email conversations as important and future email in this conversation will also be marked important.

Measurement and Metrics

image

The ClearContext Scorecard provides a way to track your progress implementing GTD. Click More at the bottom of the Dashboard to measure how effectively you are staying on top of your Inbox, response time, etc..

AutoAssign

Use AutoAssign to create rules that automatically file incoming messages to Project folders. Rules can be based on sender or keywords. Access AutoAssign from the ClearContext menu.

Do Not Disturb

image

When you are ready to focus on your projects in Outlook, use Do Not Disturb to turn off all new message notifications for a given time period. For example, select Do Not Disturb from the ClearContext menu and set it to 3 hours. For the time period you have specified, ClearContext will suppress the Outlook pop-up alert, the new mail icon in the system tray, the cursor change and the new mail sound, allowing you to focus on your work without distraction.  This feature is available in Outlook 2007 and earlier.

Additional Information

There is a wealth of additional information on the use and optimization of Outlook available on the ClearContext Website. Of particular interest is our ClearContext Daily Workflow, a lightweight process for managing email on a daily basis. All of the above features are documented in more detail in our User Guide. We have created several short tutorials to help learn about the product. Check out our weblog for tips and techniques for getting the most out of ClearContext and/or our User Forums for technical questions and features and tips suggestions.

GTD & ClearContext: Review

The release of v5.1 has made it easier than ever to implement GTD within Outlook.  We’re posting excerpts from our GTD Setup Guide.  See Parts 1, 2, 3 & 4.

Review

Once the Inbox has been processed, ClearContext provides several methods for reviewing and acting on To-Do Lists.

imageSummary Dashboard

The Summary Dashboard in the ClearContext Sidebar is the control panel for your day. If you close the Sidebar, access the Dashboard from the button in the toolbar or via the ClearContext menu.

Projects

The Projects section at the top of the Dashboard allows you to quickly see which Projects require your attention.

Large counts to the left of each Project give the total number of Due tasks, with a red dot indicating those Project with overdue tasks.

Use the pin icon to pin your most important Projects. To view only pinned Projects, select a view from the Project header (Active in the picture to the left).

Double-click <Unassigned Tasks> to view all your tasks without Project assignment. Double-click individual Projects to open a Project Dashboard.

Tasks/Appts

The Tasks and Appointments section of the Dashboard shows all of your Tasks across projects. Use the filter selector in the header (All in the picture to the left) to filter for date or category. When ready to focus on a single context (i.e. @Computer) select a category filter to view only those items in that Action List. The <Categorized> filter shows only those items with categories assigned to them; a simple way to view all of next actions in one place.

The Due Date and Priority buttons at the bottom of the Dashboard can be used to quickly change task information. Highlight multiple tasks and click the Due Date button to change the date due for all selected tasks.

imageProject Dashboard

When ready to focus on an individual project, open the Project Dashboard from the Projects section of the Dashboard.

Project Summary

In the Project Summary, add project related notes and view all tasks and appointments assigned to the Project. Use the Change menu in the Project header to quickly open pinned Projects. Click Folder to open the associated Project folder. Move or Pin a Project from the Actions menu.

Files and Contacts

Click the Files tab at the bottom of the Project Dashboard to view all attachments that have been emailed for this Project. Click the Contacts tab to view all Contacts you have corresponded with for this Project.

ClearContext Organizer

image

Click the Organize Tasks button at the top of the Dashboard to open up the ClearContext Organizer and perform the weekly review. There are four tabs in the Organizer:

  • Dates – view overdue and pending tasks at a glance. Highlight multiple tasks and use the Due Date button to quickly move tasks due dates.
  • Project – see project assignments for all tasks and quickly assign Projects to unassigned tasks.
  • Category – view all tasks by context and assign new categories as needed.
  • Review – view completed or pending tasks by week. Filter by Project or Category.

The Weekly Review

Many GTD users find David Allen’s suggestion of a weekly review to be the most critical component of their GTD implementation. To automate the weekly review with ClearContext, use the ClearContext Organizer and ClearContext’s custom Inbox views to process actions by project. To perform the review, use these tools on a weekly basis:

  1. Empty the Inbox – Go through the email remaining for the last week – starting with high priority email first – and action it using Task, Schedule, Delegate, Defer or Delete.
  2. Empty the Head – Capture new tasks using the quick Add Task function on the Dashboard.
  3. Review – Select Organizer from the ClearContext menu.
    • Click the Date tab. Mark items complete as needed and reassign dates in bulk.
    • On the Project tab, ensure that all tasks have Projects assigned to them.
    • Open the Category tab and assign tasks to Action lists as required.
    • Click Review and look at the past week’s completed items to see if further action is required and/or document for reference.
    • View Pending on the Review tab and review tasks and appointments for the upcoming week. Right click and reassign dates as necessary. Capture any new actions that are triggered. Optionally filter by Project or Category for closer scrutiny.
  4. Review the Someday/Maybe folder and transfer any items to your system that have become active or delete any items that are no longer relevant.

MessageContext

image

The MessageContext is a view of all related items for a given conversation. For example, your Inbox is empty and you receive a new message regarding a meeting you are attending later in the week. Open MessageContext to see previous emails about this meeting, along with any tasks or appointments created from the conversation. In Outlook 2003, access MessageContext via a button on the toolbar.

For Advanced Outlook Users: Creating Custom Task Views that Include the Project Name

The Dashboard and ClearContext Organizer are the quickest ways to view all To Do items, including Tasks and Appointments, by Project name. If desired, the Project name can be added to custom task views so that tasks within the native Outlook task pane can be sorted by project as well. To add Project to a Task view:

image

  1. 1. Go to the task pane and click on the view that you want to alter.
  2. 2. Right click the header on the tasks list (i.e. where it says Subject, Due Date, etc.) and select "Field Chooser."
  3. 3. Select "Form…" in the drop down where it says "Frequently Used Fields:"
  4. 4. In the "Select Enterprise forms for this folder" dialog select Application Forms.
  5. 5. Highlight ClearContext and press Add…
  6. 6. Close the current dialog.
  7. 7. In the Field chooser, add CC-TopicName by clicking it and dragging it to the headers you initially right clicked.
  8. 8. Exit out of the field chooser.
  9. 9. If desired, change the name of the header on this field by right clicking CC-TopicName, selecting Format Columns, and changing the Label.

Repeat for each view that you want to alter.

GTD & ClearContext: Project Designation

The release of v5.1 has made it easier than ever to implement GTD within Outlook.  Over the next week I’ll be posting excerpts from our GTD Setup Guide.  See Parts 1, 2, & 3.

Project Designation

imageClearContext makes it easy to assign Projects to messages, tasks and appointments. When filing email to a Project folder, all messages in that email conversation – past, present and future – are automatically associated with the assigned project. As you create a Task or Appointment, ClearContext asks for a Project assignment. ClearContext suggests project names for those conversations that do not already have a project assigned. Press the File button to accept the suggestion or the arrow next to it to open the Project Selector and see other Project choices.

File Msg, Thread and Project buttons quickly move email messages from the Inbox to automatically created Project folders for later reference. In addition, ClearContext can automatically save sent messages in these project folders to ensure that all project correspondence is properly tagged and stored together in one filing system. Project assignments are automatically carried over to Tasks and Appointments generated from email conversation and Projects can be easily assigned to new items as they are created. ClearContext suggests Project assignment based on your email history with the current contact.

The Project Selector (depicted above) allows quick project assignment to messages, tasks and appointments. Select a suggested Project or start typing the Project name and ClearContext will narrow your Project list to match your search. Arrow down to select a Project and assign to the conversation.

To create multi-level projects, place a “/” between the Main Project heading and the Sub-Project (i.e. “Client/Implementation”). ClearContext will automatically create Project folders that reflect the hierarchy (i.e. main folder “Client” with sub-folder “Implementation”).

Someday/Maybe File

If you would like to follow David Allen’s suggestion to maintain a Someday/Maybe file, create a special ClearContext Project called “Someday.” Assign Project “Someday” to ideas that you want to think about later. Click the file button and the message will automatically be placed in a subfolder of your ClearContext Project folder. When you’re ready to review these items, open up the Project folder for review.

GTD & ClearContext: Action Management

The release of v5.1 has made it easier than ever to implement GTD within Outlook.  Over the next week I’ll be posting excerpts from our GTD Setup Guide.  See Parts 1 & 2.

Action Management

Following Allen’s advice, the bulk of your email messages (those that you can’t answer in two minutes, delete, or file away for reference) will become tasks or appointments in your trusted system. ClearContext Pro’s Task, Delegate and Schedule buttons allow you to quickly create tasks and appointments from email messages. Assign Outlook categories to these items to denote context, ensuring that they are assigned to the appropriate action list.

image

Category Assignment in Outlook 2007 and Later

image

Category Assignment in Outlook 2003

Setup

The first step in setting this up, customize your Outlook Master Categories list to include the action list categories you use as you process your Outlook information. Putting the ‘@” symbol in front of each description will ensure that these display at the top of the categories list. We realize that this is a very personal list that each user will want to tweak for his/her on working style. Examples of common categories many of our customers have found useful include:

@Car

@Delegate

@Desk

@Home

@Internet

@Phone

To customize the category list in Outlook 2003 and earlier:

  1. Open a new task or appointment
  2. Click the categories button in the lower right hand corner
  3. Click the Master Category list button
  4. Edit the list as desired

To customize the category list in Outlook 2007:

  1. Right click the category color field on an email, task, or appointment
  2. Select the “All Categories…” menu item
  3. Click New and add a category
  4. Optionally add a color code
  5. Repeat for each category

Processing

Once this setup is complete, process the inbox using the ClearContext workflow buttons, answering those emails that you can, deleting those that you don’t need, filing reference material using ClearContext File buttons, and creating tasks or appointments for future work. As tasks and appointments are created, assign a context using Outlook’s native category assignment feature and one the categories created above. This will automatically associate the item with the appropriate action list.

The “Tickler” File

image
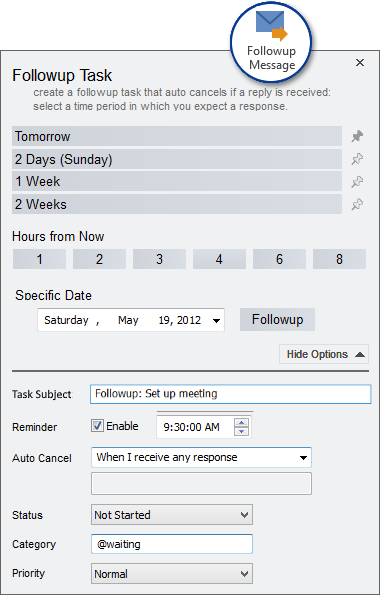
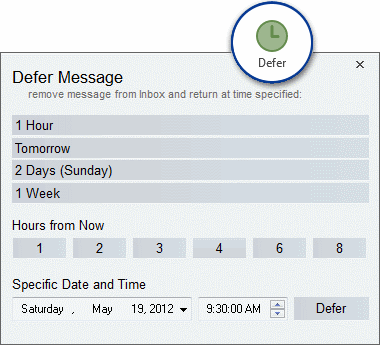
Many GTD’ers follow Mr. Allen’s suggestion of creating a “tickler file.” ClearContext’s Defer button is an excellent way to maintain an electronic version of this file. The Defer button moves an email out of the inbox and schedules it as unread at a given time interval or on a given date.

When a message is deferred, a dated folder is created as a subfolder of the “ClearContext Deferred” folder. Consider these your tickler files. Click on any day’s folder to review upcoming items or simply wait for the message to re-appear in your Inbox as scheduled.

For example, say you receive an invite to a corporate networking event on the 25th. It’s still three weeks off and you don’t need to RSVP until the day before. Click Defer and “schedule” the message for the 24th. The message is moved into a subfolder with the month and day you have designated. You can click on this folder at anytime to see all messages pending for that day. Alternatively, the message automatically re-appears in your Inbox, unread, on the 24th, reminding you that you need to make a decision about the event.