The v5.1 release has introduced many new time-saving enhancements to the product. We’re posting the updated User Guide over the next few weeks.
ClearContext automates the filing process, making it easier to identify and store messages by remembering where you previously filed email.

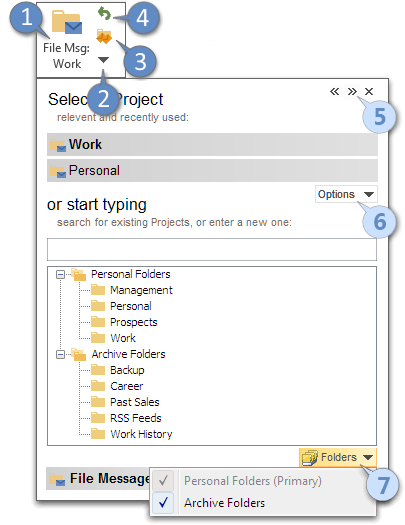
1. File Msg files email to the listed folder
![]() indicates that you previously filed messages in this conversation.
indicates that you previously filed messages in this conversation. ![]() indicates that this is a suggested folder. Shortcut Key: Alt-M
indicates that this is a suggested folder. Shortcut Key: Alt-M
2. Press to see other filing choices
![]() opens other choices in the Project selector. Select a recently used folder or start typing to filter the full folder list. Hide or add additional suggestions using the links in the selector. Shortcut Key: CTRL-ALT-M
opens other choices in the Project selector. Select a recently used folder or start typing to filter the full folder list. Hide or add additional suggestions using the links in the selector. Shortcut Key: CTRL-ALT-M
3. Thread files the entire conversation
File all messages from this conversation thread into the folder listed on the File Msg button. Press ![]() to see other choices.
to see other choices.
4. Undo the last message filed
If you accidentally filed a message, Undo will return it to the current folder
* File Original or Delete Original as you reply

Enable File under Original Message when replying. The message you are replying to will be automatically filed to the Project folder you assign. ClearContext remembers this setting.
Delete works the same way, deleting the message you are replying to. This setting is not remembered. Enable ClearContext to delete all unassigned, non-Project messages as you reply via ClearContext > Options > Misc.
* File This Email files the message you are sending

Enable File This Email when sending email. The message you are sending will be automatically filed to the Project folder assigned. ClearContext remembers this setting.
 * File Project files all messages in the current Project
Highlight a message with a Project assigned to it and select File Project from the ClearContext menu. All messages in the current folder with this Project assigned to it will be filed. This button can be added to the toolbar.
* Jump To Folder opens a project folder
Select Jump to Folder from the ClearContext menu to quickly open a folder. This button can be added to the toolbar.
Options
5. Expand the Project selector
Press the right arrow to expand the selector and see suggestions in two columns.
6. Change the number of suggestions
Click the links to show more or less suggestions
7. Add/remove available mail files
Click Mail Files to add or remove available data stores. Go to ClearContext > Options > Configuration to add Public Folders and SharePoint Lists. Designate a Personal Folders file as your primary here as well. If all of your folders reside under a single folder (i.e. sub-folders of the Inbox) designate the Root folder for Filing and Projects here (i.e. /Inbox).
* One-click filing

When you disable one-click filing via ClearContext > Options > UI/Toolbar, ClearContext only shows a project in the File Msg button when previous messages in that conversation have been filed.
* Assign Project
To assign a project without filing, select Assign Project from the ClearContext menu. Add this button to the toolbar via ClearContext > Options > UI/Toolbar. You can also remove a project assignment with this button.
* Sent Message Filing

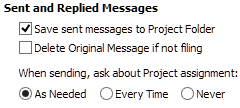
Enable Save messages to Project Folder at ClearContext > Options > Project Options to automatically move sent messages to project folders as you send. You can also enable this feature by selecting File This Message as you send email.
* When messages are moved to a Project
![]()
By default, ClearContext monitors projects folders and assigns that project to email conversations when messages appear there. Configure this behavior at ClearContext > Options > Projects Options.
* Category Synchronization
![]()
By default, ClearContext writes the Project name to the message Category field with Brackets around it. Turn this on/off and change options in Project Options.
* Single Folder Filing

To file all messages to a single folder instead of individual project folders, select File all messages to root folder in Project Options. When you press any Filing button, ClearContext will assign the Project Category to the message and move it to the folder you specify.
Tutorial
See our filing tutorial for additional info.
Filing Tips
Multi-level Projects: To create multi-level projects, enter the Project names separated by a “/”. For example, “Work/Admin” would store the message in the “Admin” subfolder underneath the “Work” main folder.
New Messages: Assign a project to a new message via the Project button on the open message prior to sending. All email responses to that message will automatically include the project name. In addition, if you are utilizing the Save Sent Messages option, this new message will automatically be filed in the appropriate Project folder.
Category Delimiters: Change the Prefix and Suffix appended to Project names when duplicated in the category field via ClearContext > Options > Project Options. Leave these fields blank to remove the delimiters.
