Posts categorized “tips”.

New in v4: Mark as Read When Filing

One of the oft-requested features in v3 and earlier was the ability to mark messages as read when they are filed.  As you are probably aware, IMS allows the ability to file individual messages, message conversations or entire Topics of messages.  IMS v4 automatically marks all of these messages as read when filing.  You can change this behavior to leave unread messages be via ClearContext > Options > Preferences > Misc > Filing.  See our User guide for more information on Topics and Filing.

New in V4: Topic Query on Save

For v4, we extended Topic Query on Save functionality from outgoing messages to include Tasks and Appointments.  As you create new items, IMS will query you for a Topic assignment.  This allows you to view this information by Topic in the IMS Dashboard.  Turn this feature on/off in the Topic Assignment on New Tasks and Appointments at ClearContext > Options > Preferences > Tasks/Appts:

image

Similarly, you can turn this feature on/off for messages via "Ask about selecting a Topic if one is not assigned" on the Topic Options tab:

image

New in V4: Do Not Disturb

When you are ready to focus on your work for the day, use Do Not Disturb to disable all default Outlook notifications for new messages, including New Mail Desktop Alerts, changes in the mouse cursor, the envelope icon in the system tray and the default new mail sound. 

image 

To use this feature, select Do Not Disturb from the ClearContext menu.  In the Do Not Disturb dialog, select the length of time that you would like to have new mail notifications disabled and click OK.  When the time frame specified has past, IMS will re-enable message notifications.  If you would like to reset your notifications prior to the expiration time, select Do Not Disturb from the menu again.  Do Not Disturb will also reset notifications if you restart Outlook.

Alerts will continue to notify you of important email that needs to be responded to, even if it is received during the Do Not Disturb quiet period.  Set Alerts on your most important contacts or email conversations if you want to be notified of receipt regardless of Do Not Disturb status.

Task Reminders

A quick tip…  If you are using IMS task functionality, you may want to adjust Outlook’s task reminder default settings.  Go to Tools > Options:

image

  • The reminder time is the default notification time Outlook uses when creating new tasks.  This is also the default time that IMS uses for Defer.  I suggest setting this to an hour after you normally start your day, giving you the chance to identify your most important items prior to the alarms going off.
  • Click the Task Options for additional preferences.  I personally prefer that "Set reminders on tasks with due dates" is unchecked.  I then manually set task reminders for my really important, time sensitive tasks.

New in V4: Alerts

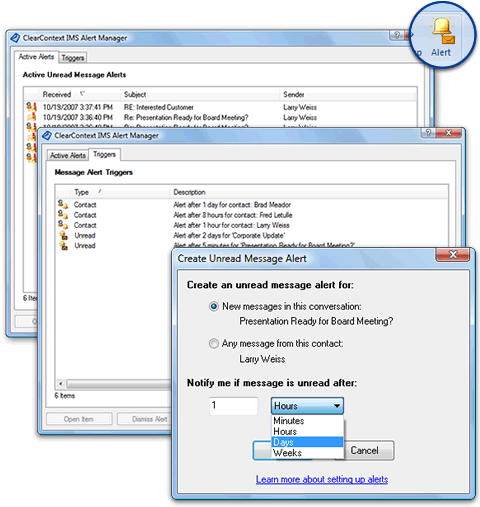
One of the major new features in IMS v4 is Alerts.  Create an Alert by message conversation or contact to ensure that you never miss an important reply again.  I think of these as personal Service Level Agreements; if you have an important client or are involved in a very important email thread, set an Alert to ensure that you respond in a timely fashion.

user_guide_alerts_overview

There are two different types of unread message Alerts: 

  • Conversation Alerts are triggered by an unread message in the same email conversation (i.e. replies to the current email) 
  • Contact Alerts are triggered by an email from the same sender.

For example, if you select a 2 hour conversation alert, IMS will notify you if you receive a reply to the message and do not read it within the 2 hour grace period. 

There are two ways to create an Alert: 

  1. Highlight a message and press the Alert button on one of the IMS toolbars.  This will open the Alert create dialog where you can specify the type of Alert you are creating (Conversation or Contact) and the time period.  If you receive a message that meets the criterion you set and do not read it within the time frame specified, IMS will notify you via the Alert Management window. 
  2. Open a contact and press the Alert button on the contact toolbar.  As above this gives the option to create a Contact alert.  If an Alert already exists for this contact, IMS will cancel it.

Alerts Management 

The Alerts Management window appears when an Alert is triggered and can be opened via the ClearContext menu.  It consists of two tabs: 

  • Active Alerts – this shows all of the currently active Alerts for unread messages in your Inbox: 
    • Double click a notification or press the Open Item button to open a message and read it. 
    • The Dismiss Alert button will turn off the alert for the current message. 
    • The Cancel Alert button removes the Alert trigger for the current item, ensuring that no further alerts will be issued for this particular thread or contact.
  • Triggers – this tab shows all of the Alert triggers that you have set up.  Cancel Alert will remove the currently selected thread or contact alert.

Alerts are triggered regardless of the current Do Not Disturb status. 

New in v4: Toolbar Management

In IMS v4, at the request of many of our customers, we consolidated the inbox toolbars down from two to one:

Two toolbars in v3

toolbar_v3

Default toolbar in v4

toolbar_v4

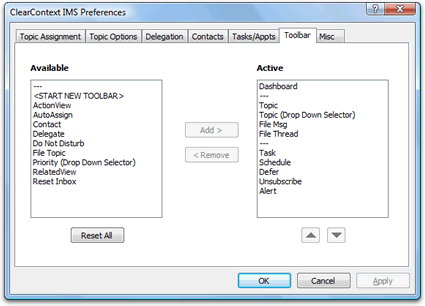
This is customizable via ClearContext Preferences.  Access the toolbar management feature via ClearContext > Options > Preferences > Toolbar:

toolbar_preferences

To add buttons to the toolbar, highlight the button name in the Available column and click Add.  To remove, click items in the Active column and click Remove.  Use the arrows below the Active field to change the order of the toolbar buttons.  Reset All will put the buttons back in their factory default positions.  You will need to restart Outlook for the changes to take effect.

Do you miss the second toolbar?

Add <START NEW TOOLBAR> to the active column to create a second toolbar.  Any items that appear in the active list below <START NEW TOOLBAR> will be placed on a second toolbar.  One caveat – the items marked "Drop Down Selector" must appear on the first toolbar.

Start Outlook with the Dashboard

In the Identify phase of the IMS Daily Workflow, we recommend that you start your day with the Dashboard, reviewing your Tasks and Appointments before moving into Inbox Management.

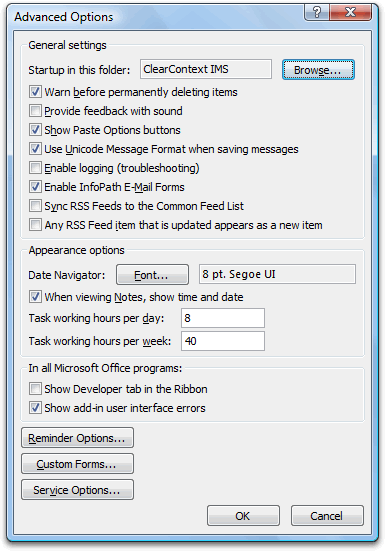
To take this a step further, you can set Outlook to automatically open the Dashboard on startup, helping you avoid the temptation of looking at your email before you’ve had a chance to identify the day’s priorities.  Go to Tools > Options > Advanced Options:

dashboard_startup_options

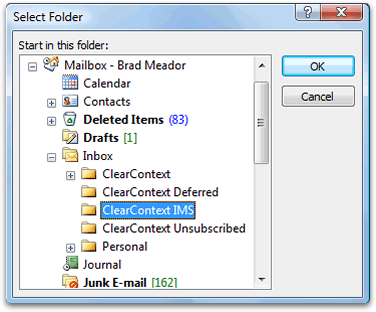
Click the Browse button and select the Inbox sub-folder, ClearContext IMS:

dashboard_startup_folders

Select OK on this and the Options dialog.  Voila!  On startup Outlook will open up the Dashboard so that you can size up your day.

New in V4: IMS Dashboard

The Office Letter review of IMS v4 had this to say about the new v4 IMS Dashboard:

"The new Dashboard feature puts all messages, appointments, notices, and tasks on a single screen — right at your fingertips. It’s similar to the To-Do bar Microsoft introduced in Outlook 2007, except that it’s more attractive, easier to read, and lets you display all items or just those you want to see using a topic and/or category filter."

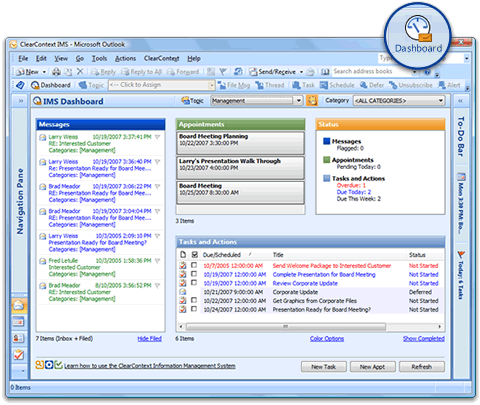
I see the Dashboard as the control panel for my workday, allowing me to view all messages, appointments, tasks and deferred messages by Topic and category.  Open the Dashboard by pressing the IMS Dashboard button on the main toolbar.  To close it, click on another folder, such as the Inbox, or another area in Outlook, such as the Calendar.

user_guide_dashboard_overview

Select a Topic or Category in the title bar of the dashboard to filter your To Do’s.  The Topic Selector Topic Selector button allows you to search on Topics and the Show Sub-Topics Show Sub-Topics button instructs the Dashboard to include items from sub-folders of the currently selected Topic.

There are four components of the Dashboard:

  • Messages -This pane shows different messages depending on whether a filter is applied or not.  If no Topic or category is applied, Messages shows flagged Inbox messages.  Once a filter is applied, Messages shows all Inbox and filed messages for the current filter.  Toggle the display of filed messages off/on via the Hide Filed link at the bottom of the pane. 
  • Appointments – This shows all active appointments on your calendar.  By default, today’s appointments are shown in blue.  Recurring appointments show only the first instance in the appointment series. 
  • Tasks and Actions – This is the place to manage all of your tasks and deferred messages.  Change the way tasks are color-coded using the Color Options link.  This will also change the color-coding for today’s appointments.  Toggle the display of completed items via the Show Completed link at the bottom right corner of this pane.  Click the checkbox next to an item to mark it complete. 
  • Status – This is a quick status of your To Do’s for the current filter.

When a filter is applied, the New Task and New Appointment buttons at the bottom of the Dashboard starts new items with the current Topic or category pre-assigned.  The Refresh button refreshes all data on the dashboard.

The Dashboard will most definitely evolve as we enhance the product.  Future iterations will pull in additional information and provide additional interactivity.  Watch the weblog for future detail.

For Newbies: Getting Started with IMS v4

We pulled together a Getting Started page for folks who are trying out the app for the first time.  If interested, here’s what we posted. Feedback is always welcome.

In just a few minutes, this will illustrate the core concepts of the IMS solution, allowing you to quickly move through your inbox and focus on working on projects.  For additional tips on best use of the product, see our Solutions Pages:

Prioritized Inbox

After install, the first time you open Outlook, IMS will analyze your email history to rank your email contacts.  Using this and other information about your email patterns, IMS will prioritize your inbox.

The setup process normally only takes a few minutes, but will take longer for large email files and inboxes.


IMS View Wizard

Once setup is complete, the inbox messages will be color-coded to highlight the most important messages.  You can select alternate custom inbox views from the ClearContext->Inbox Views menu, or at any time revert to standard Outlook views.


A Topic will be created for each folder under your inbox.  Use the Topic button or dropdown to assign topics to email.  All messages in that email conversation will be assigned that Topic. 


Convert Email to TasksCreate Appointments from Messages
Use the Task and Schedule buttons to create a task and appointment linked to your email message. 

File Message
Click File Msg to file the email directly into a Topic folder. 

Defer messages until later
Use the Defer function to move messages out of your Inbox for a specified time period. 

Use these message management functions on a number of emails in your inbox to act on your email quickly and efficiently.


IMS Dashboard

Open the Dashboard.  The initial screen will show pending tasks and appointments, as well as flagged messages in the inbox.  Select a Topic you used earlier via the dropdown or Topic button in the Dashboard.   Now, all messages, tasks and appointments with that Topic will be displayed in a consolidated project view.


Alerts, Do Not Disturb, Unsubscribe, Follow-Up, Delegate and AutoAssign are just a few of the other features within ClearContext that can be accessed in the Inbox from the ClearContext menu for a more complete evaluation of the product.

See our tutorials for demonstrations of these features.

TWC Outlook Productivity Newsletter

Michael Linenberger, author of best-selling Microsoft Outlook book Total Workday Control and ClearContext partner, publishes a newsletter chock full of Outlook tips and ways to leverage the TWC system.  In the latest he talks about IMS v4 and how it works with TWC.  If interested, you can sign up to receive the newsletter at the link at the bottom of the page.