The v5.1 release has introduced many new time-saving enhancements to the product. We’re posting the updated User Guide over the next few weeks.
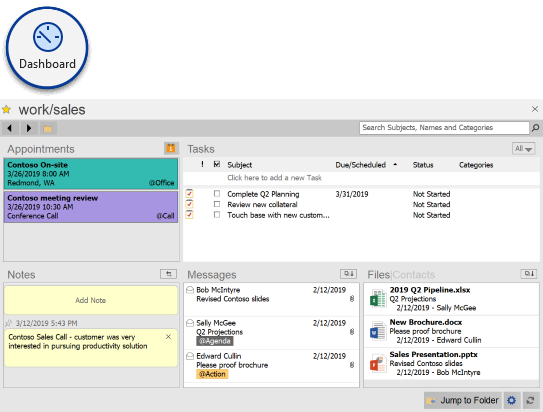
The Project Dashboard displays all notes, tasks, appointments, contacts, and attachments by Project.
 There are several ways to open a Project Dashboard:
- Double-click a Project name in the Summary Dashboard.
- Open any Project folder and click on the Project tab in the sidebar.
- From the Project tab, select Change in the header to select from a list of pinned projects or click Other Projects to open the Project selector.
Once open, the Project Dashboard is divided into three sections that can be navigated via the tabs at the bottom of the sidebar – Project Summary, Files and Contacts.

Add notes to the project and view all of your project-related tasks and appointments in the Project Summary. This section is available for Project folders, but is not present in non-Project folders (such as the Inbox). There are three buttons across the top of this pane:
 Organize launches the ClearContext Organizer in the Project tab.
- Folder opens the project folder in Outlook (if it isn’t opened already).
- Select Actions to:
- Pin the current project so that it appears in your pinned projects list in the Summary Dashboard and the Change menu.
- Move the current project. This function will reassign all notes, tasks, appointments and messages to the Project that you select.
Project Notes
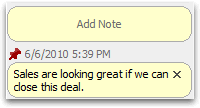 Click Add Note in the Yellow bubble at the top of the Project Summary to add a note about the project:
- Use CTRL-ENTER to add a new line.
- Press ENTER to complete the note.
- Notes are listed in descending date order. Use the pin icon
 to pin notes to the top of the list.
- Click X to delete a note.
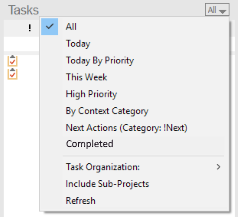 Tasks/Appointments
This section displays all Tasks and Appointments with the current Project assigned to them. Most of the options in this pane are the same as the Tasks/Appointments section of the Summary Dashboard. When adding a task from the Project dashboard, by default the current Project is assigned to the task. Select Include Sub-Projects from the Tasks/Appts menu to show tasks for the current project (i.e.MainProject) and all sub-projects of the current Project (i.e. MainProject/SubProject).
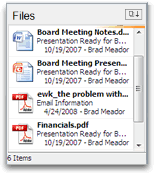

The Files section shows all attachments found in the messages that reside in the Project folder. For attachments that appear in more than one message, click the more button to see a list of all emails that contain the file.
Perform the following actions from within the Files pane:
- Double-click a file to open the most recent message to contain that attachment.
- Highlight message(s) and right click or select the Actions menu to open the message containing the attachment, open the attachment itself or forward or save the selected files.
- Sort the file listing via the Actions menu.

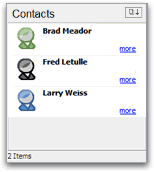 The Contacts pane shows all Contacts in the From: fields for messages that appear in the Messages pane. The colored contact icon indicates the assigned priority for the contact. For contacts that exist in the Outlook address book, click more to show additional contact details. For contacts that do not exist in the Outlook address book, click create to quickly add a record for the current sender.
Perform the following actions from within the Contacts pane:
- Double-click a contact to open the contact record. Adjust priority from here to improve Outlook prioritization.
- Highlight contact(s) and right click or select the Actions menu to email or set up an appointment with the group, export contacts to a file or create a distribution list.
- Sort the contact list via the Actions menu.
Project Management
Pin your most frequently used projects so that you can quickly open them from the Project tab.
Posted by brad at 6:21 am on August 11th, 2010.
Categories: tips.
The v5.1 release has introduced many new time-saving enhancements to the product. We’re posting the updated User Guide over the next few weeks.
Divided into three panes – Projects, Tasks/Appointments and My Average Stats – the Summary Dashboard provides a control panel for your workday. Use the Dashboard button on the main toolbar to open and close it the Dashboard sidebar.
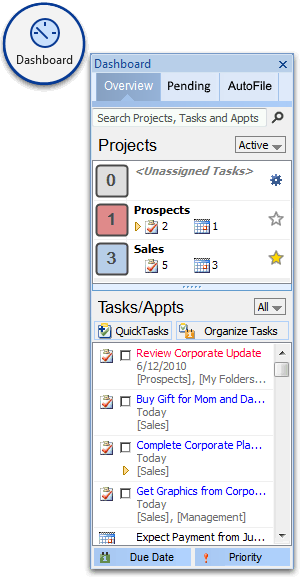
Projects

The Projects pane shows a summary of your Projects. Large status indicators to the right of each project give a count of due tasks; blue indicating those projects with tasks due today and red highlighting projects with overdue tasks.
- Pin your most important projects by pressing the pin icon to the right of a project name.
- Use the view menu to filter your project list:
- Active shows projects with tasks assigned to them plus all pinned projects.
- Pinned displays only pinned projects.
- Due shows all projects with tasks that are due today or earlier.
- Find opens a search box. Type a Project name in the filter to narrow the list of Projects down.
- Double-click any Project in the list to drill down to a Project Dashboard tab.
- Double-click <Unassigned Tasks> to open the ClearContext Organizer and view tasks without Project assignments.
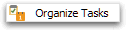 The Organize Tasks button shows a total count of overdue tasks. Click it to launch the ClearContext Organizer.
Tasks/Appointments
This pane lists all of your tasks and appointments. Quickly act on tasks from here:
- Check a task to mark it complete.
- Highlight multiple tasks to act on them at the same time.
- Use the Due Date button to reassign a due date to the currently selected tasks.
- Use the Priority button to elevate the priority of the currently selected tasks.
- Right click tasks to act from the context menu.
 Double-click a task or appointment to open it.
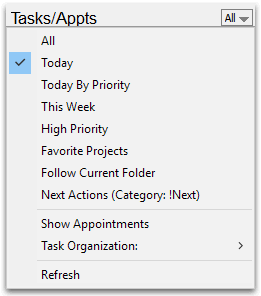
Filter the list from the view menu:
- See All tasks and appointments, items with a due date of Today or items with a due date This Week.
- Today by Priority shows all items due today, ordered by task priority.
- From Pinned Projects displays items from projects that you pinned in the Projects list.
- By Category allows you to filter for a given category or tasks that have a category associated with them (<Categorized>).
- Deselect Show Appointments to remove appointments from the list in this pane.
Create new tasks on the fly via the Add Task box at the top of the pane:
 Type the task subject and press ENTER to create the task with a date of today. If you have instructed ClearContext to ask for a project assignment on save, the project selector will appear.
 - Click the down arrow
 to show more options. Assign a project or date to the new task from here.
My Average Stats
 My Average Stats rotates various statistics about your email use, including average messages received, response time, etc.. Press the More button to open the ClearContext Scorecard for more detail.
Get the Most Out of the Dashboard
The Dashboard is the crux of the Succeed component of the ClearContext process, allowing you to view all of your Outlook information by Project or Category. To take full advantage of this functionality, instruct ClearContext to query for Project assignment to Messages, Tasks and Appointments as you create them.
Posted by brad at 6:19 am on August 10th, 2010.
Categories: tips.
The v5.1 release has introduced many new time-saving enhancements to the product. We’re posting the updated User Guide over the next few weeks.
The Delegate function supports the quick assignment of emails to other individuals you are working with. Select Delegate from the ClearContext Inbox menu (i.e. ClearContext > Delegate this Message) or the ClearContext open message toolbar. The first time you select Delegate you will be presented with the options screen below.

You have two options when delegating an email:
-
Create an Outlook Managed Delegated Task: This creates an Outlook task with the contents of the email pasted into it and attaches the original email. Enter a recipient name in the To: field and click Send – the assigned task is sent to your delegate. A linked task is created in your task list as well. If the recipient is an Outlook user, he can choose to accept or decline the task and task status updates are communicated back to you.
-
Delegate this item by forwarding this email: This option forwards the original email to your delegate and allows you to create a task in your task list to remind you of the assignment. Much like the ClearContext task button, the contents of the original email and an attachment are pasted into the task you create. Designate the initial status for the task (Waiting for someone else, In progress, etc.) from this dialog as well.
In both cases, use File Original in the task created to file the message you are delegating.
By default, the Inbox toolbar does not include the Delegate button. You can add it to the toolbar via toolbar customization.
Remember These Choices
You can skip the Delegate options dialog in the future by checking "Remember these choices and don’t ask me again." If you change your mind, you can always alter the options from ClearContext > Options > Tasks/Appts.

Posted by brad at 6:17 am on August 9th, 2010.
Categories: tips.
The v5.1 release has introduced many new time-saving enhancements to the product. We’re posting the updated User Guide over the next few weeks.
The Schedule button will automatically create appointments from email. Highlight an email, click Schedule, and the message contents will be pasted into a new appointment. Set the time and date for the appointment and click Save and Close. As in the creation of Tasks, you can set project and message processing options while you are creating the appointment and it will appear in the conversation’s MessageContext.
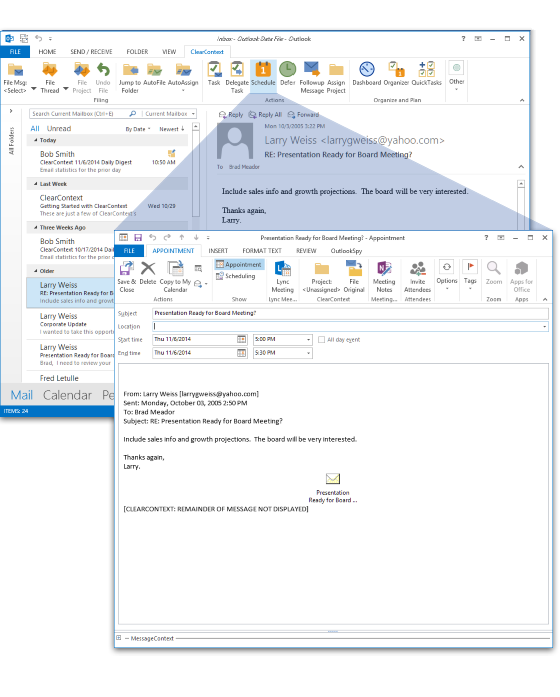
Project Assignment
ClearContext will query for a Project assignment when creating an appointment. This allows you to view this information by Project in the ClearContext Dashboard. Turn this feature on/off via Project Assignment on New Appointments atClearContext > Options > Tasks/Appts.
File Original
 When creating an appointment from an email, ClearContext can automatically file the original message, moving it out of the Inbox and saving the need to deal with it again. Enable File Original on the appointment toolbar and ClearContext will move the message you are creating the appointment from into the Project folder you select. ClearContext remembers this option the next time you create an appointment.
Appointment Options
By default, ClearContext truncates the text of long emails and attaches a copy of the message when creating an appointment or task. Turn these features on/off via ClearContext > Options > Tasks/Appts.
Custom Forms Support
If you would like to use a custom Outlook form for task generation when pressing the Schedule button, specify that form viaClearContext > Options > Tasks/Appts. Under Create Tasks and Appointments with Custom Forms, add the message class you wish to use for Appointments. For example, IPM.Appointments.MyApptForm.
Responding to Attached Emails
In the creation of Tasks and Appointments, ClearContext attaches the original email to the item. If, while reviewing the task or appointment, you decide to respond to the original email, double-click the message attachment to open it and click Reply.
Posted by brad at 6:16 am on August 6th, 2010.
Categories: tips.
The v5.1 release has introduced many new time-saving enhancements to the product. We’re posting the updated User Guide over the next few weeks.
The ClearContext Task button allows you to quickly add an email to your task list. Clicking Task will open a new Outlook task with the subject of the email and contents pasted into it and the original message attached. Set a due date and save to enter into your task list.
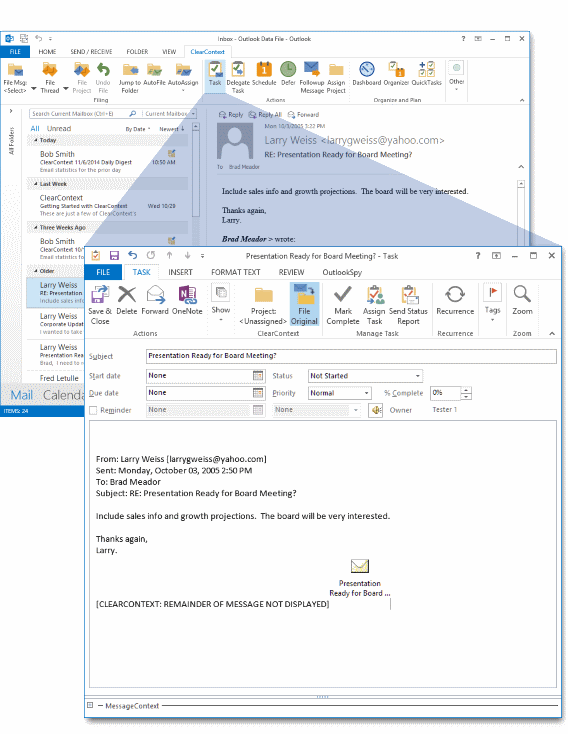
Once the task is created from a message, it is associated with the email conversation and will appear in the original conversation’s MessageContext.
Project Assignment
The Project field in a task is pre-populated with the original email’s project. If one has not been assigned previously, ClearContext will query for a Project assignment when creating a task. This allows you to view this information by Project in the ClearContext Dashboard. Turn this feature on/off via Project Assignment on New Tasks at ClearContext > Options > Tasks/Appts.
File Original
When creating a task from an email, ClearContext can automatically file the original message, moving it out of the Inbox and saving the need to deal with it again. Enable File Original on the task toolbar and ClearContext will move the message you are creating the task from into the Project folder you select. ClearContext remembers this option the next time you create an appointment.
Task Options
By default, ClearContext truncates the text of long emails and attaches a copy of the message when copying creating an appointment or task. Turn these features on/off via the miscellaneous ClearContext Preference tab – ClearContext > Options > > Tasks/Appts.
Creating Custom Task Views that Include the Project Name

The Dashboard is the quickest way to view all To Do items, including Tasks and Appointments, by Project name. If desired, the Project name can be added to custom task views so that tasks within the native Outlook task pane can be sorted by Project as well. To add Project name to a Task view:
- Go to the task pane and click on the view that you want to alter.
- Right click the header on the tasks list (i.e. where it says Subject, Due Date, etc.) and select "Field Chooser."
- Select "Forms…" in the drop down where it says "Frequently Used Fields:"
- In the "Select Enterprise forms for this folder" dialog select Personal Forms (if it is not already selected).
- If Show Categories is checked, uncheck it.
- Highlight ClearContext and press Add…
- Close the current dialog.
- In the Field chooser, add CC-TopicName by clicking it and dragging it to the headers you initially right clicked.
- Exit out of the field chooser.
- If desired, change the name of the header on this field by right clicking “CC-TopicName”, selecting Format Columns, and changing the Label.
- Repeat for each view that you want to alter.
Custom Forms Support
If you would like to use a custom Outlook form for task generation when pressing the Task button, specify that form viaClearContext > Options > Tasks/Appts. Under Create Tasks and Appointments with Custom Forms, add the message class you wish to use. For example, IPM.Task.MyTaskForm.
Creating a Single Task from Multiple Emails
If you have several emails that you want to convert to a single task, select one of the messages and click the Task button. Before you save the task, drag the additional messages you want to associate with the task from the Inbox onto the task. They will be automatically attached to the item.
Posted by brad at 6:14 am on August 5th, 2010.
Categories: tips.
 We have released a minor update to v5.1 that addresses the following:
- Eliminated an issue that disables ClearContext when Outlook is opened as a background process
- Fixed MessageContext Tasks/Appointment count
- Improved threading/project assignment when sending messages with the same subject to SMTP recipients
If you are experiencing any of the above in v5.1, download and install from here.
Posted by brad at 9:32 am on August 4th, 2010.
Categories: announcements, product.
The v5.1 release has introduced many new time-saving enhancements to the product. We’re posting the updated User Guide over the next few weeks.
MessageContext provides a complete picture of the current item you are viewing. Open MessageContext to view all messages in the current email conversation. See all tasks and appointments generated from that conversation thread by pressing the Tasks and Appointments link in the bottom right hand corner. In Outlook 2007 and 2010, MessageContext is integrated in all messages, tasks, and appointments; expand it by pressing + at the bottom of the item. In Outlook 2003, open MessageContext by clicking the MessageContext button on the ClearContext toolbar.
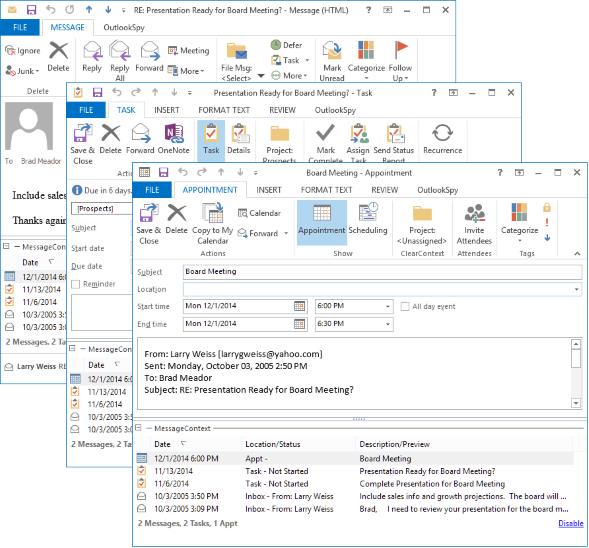
Click the Actions tab in the standalone MessageContext window or the Tasks and Appts link in the 2007 integrated MessagContext to see all To Do’s for this conversation.
Print MessageContext data from the open MessageContext window. If you change an item while this window is open, click refresh to update its status. Double-clicking an item in any MessageContext list will open it if it is available.
Outlook 2007/2010 users can enable/disable the integrated MessageContext via ClearContext > Options > UI\Toolbar.
Check MessageContext Before Replying
This happens all the time – you’re in the middle of composing a response to an involved message thread and you want to remember a key point you made in your last email in the conversation. From the reply, open MessageContext, view the entire conversation, and find your previous comments.
Posted by brad at 6:13 am on August 4th, 2010.
Categories: tips.
We are pleased to announce the release of an ActiveWords wordbase for ClearContext! The new wordbase – free for ClearContext and ActiveWords users – provides quick access to eight core ClearContext inbox management features using keyword shortcuts; including file, defer, unsubscribe, task, schedule, etc.. Download the word base here.
 For those of you new to ActiveWords, this powerful productivity tool adds keywords to Windows, providing a personal, portable, context free user interface with immediate response. Your words launch programs, jump to websites, send email, substitute text, search, and more. Receive information about any word or phrase in any context. Enter or select words in any context and your computer immediately delivers the results you want. Go to the ActiveWords website for additional information and a free download of the application.
Posted by brad at 9:55 am on August 3rd, 2010.
Categories: productivity.
The v5.1 release has introduced many new time-saving enhancements to the product. We’re posting the updated User Guide over the next few weeks.
When a new email is received, ClearContext automatically prioritizes message conversations from VIPs and known senders. Adjust message scoring on a case by case basis via Mark Conversation Important.

Change ClearContext’s automatic scoring for individual message conversations via the ClearContext open message toolbars or the ClearContext Inbox menu item (ClearContext > Message Actions > Mark Conversation Important). This marks the message important using the message prioritization options set for VIPs in ClearContext > Options > Configuration. It also marks all current and future email within that message conversation as important.
By default, the Inbox toolbar does not include Mark Conversation Important button. You can add it to the toolbar via toolbar customization.
Message Prioritization
Mark Conversation Important is a quick way to elevate importance of messages from unknown senders. To ensure that future messages from these senders are also marked as important, use Contact Prioritization.
Posted by brad at 6:12 am on August 3rd, 2010.
Categories: tips.
The v5.1 release has introduced many new time-saving enhancements to the product. We’re posting the updated User Guide over the next few weeks.
In the contact analysis process performed during setup, ClearContext’s prioritization algorithm automatically identifies those contacts that you email the most and marks them as important. ClearContext uses this contact priority to highlight emails in the Inbox from your most valued contacts. You can manually mark a contact important within the contact record.
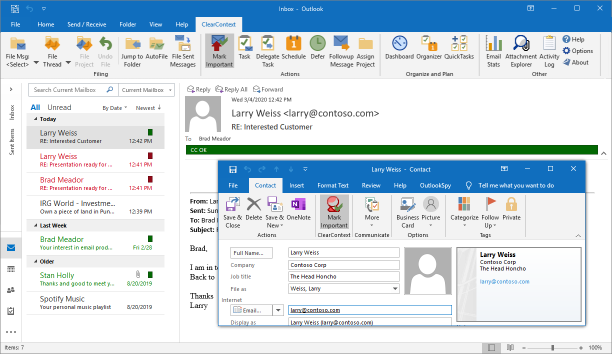
CC VIP
 During initial setup, ClearContext analyzes email history to determine email addresses from which you send and receive the most email. Using this information, your VIP contacts are marked as important. By default, email received from these contacts are marked with category CC VIP and color-coded red. To manually mark a contact as a VIP, open the sender’s contact record and enable Mark Important.
CC OK
 All messages from known senders are marked with category CC OK and color-coded green. These include messages from contacts that are in your address book – but not marked important – and messages from contacts that are not in your address book but are replying to conversations that you have already participated in.
Views
In Outlook 2007 and later, ClearContext color codes messages using Inbox category colors. In Outlook 2003, ClearContext changes the font color to indicate priority. To see font color coding in other versions of Outlook, select a ClearContext view from the Outlook view menu (View > Current View). There are three views installed during setup:
- ClearContext By Date – messages ordered by received date
- ClearContext Threaded – messages grouped by conversation and ordered by date
- ClearContext Prioritized by Category – messages grouped by category
If you change options below, the views above may no longer color code by priority.
Tutorial

See our brief message prioritization tutorial for a demonstration of these features.
Prioritization Options

Adjust prioritization options via ClearContext > Options > Configuration:
- CC’d to me – enable this option to prioritize messages that you are copied on.
- Category – change category name, color (2007 and greater) and enable/disable.
- Importance Icon – append the Outlook importance icon to messages according to priority. Note that this priority may also be communicated in message forwards and replies.
- Flag – add a flag or check for each priority. In 2007 and greater, flagged messages will appear in the To Do List.
Posted by brad at 6:10 am on August 2nd, 2010.
Categories: tips.