Posts categorized “product”.

New in v4: Toolbar Management

In IMS v4, at the request of many of our customers, we consolidated the inbox toolbars down from two to one:

Two toolbars in v3

toolbar_v3

Default toolbar in v4

toolbar_v4

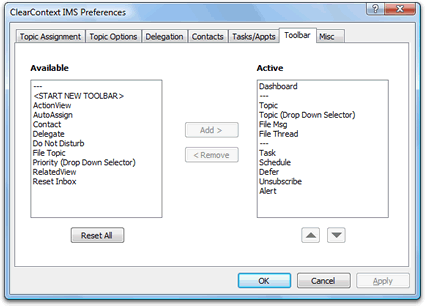
This is customizable via ClearContext Preferences.  Access the toolbar management feature via ClearContext > Options > Preferences > Toolbar:

toolbar_preferences

To add buttons to the toolbar, highlight the button name in the Available column and click Add.  To remove, click items in the Active column and click Remove.  Use the arrows below the Active field to change the order of the toolbar buttons.  Reset All will put the buttons back in their factory default positions.  You will need to restart Outlook for the changes to take effect.

Do you miss the second toolbar?

Add <START NEW TOOLBAR> to the active column to create a second toolbar.  Any items that appear in the active list below <START NEW TOOLBAR> will be placed on a second toolbar.  One caveat – the items marked "Drop Down Selector" must appear on the first toolbar.

New in V4: IMS Dashboard

The Office Letter review of IMS v4 had this to say about the new v4 IMS Dashboard:

"The new Dashboard feature puts all messages, appointments, notices, and tasks on a single screen — right at your fingertips. It’s similar to the To-Do bar Microsoft introduced in Outlook 2007, except that it’s more attractive, easier to read, and lets you display all items or just those you want to see using a topic and/or category filter."

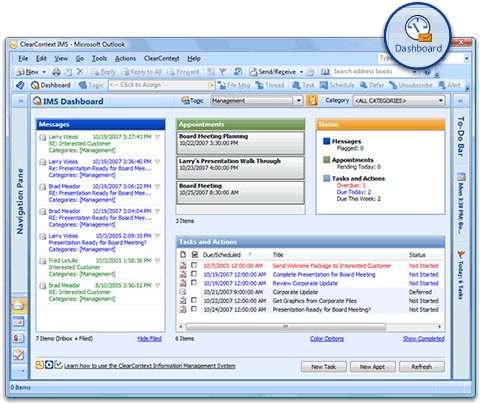
I see the Dashboard as the control panel for my workday, allowing me to view all messages, appointments, tasks and deferred messages by Topic and category.  Open the Dashboard by pressing the IMS Dashboard button on the main toolbar.  To close it, click on another folder, such as the Inbox, or another area in Outlook, such as the Calendar.

user_guide_dashboard_overview

Select a Topic or Category in the title bar of the dashboard to filter your To Do’s.  The Topic Selector Topic Selector button allows you to search on Topics and the Show Sub-Topics Show Sub-Topics button instructs the Dashboard to include items from sub-folders of the currently selected Topic.

There are four components of the Dashboard:

  • Messages -This pane shows different messages depending on whether a filter is applied or not.  If no Topic or category is applied, Messages shows flagged Inbox messages.  Once a filter is applied, Messages shows all Inbox and filed messages for the current filter.  Toggle the display of filed messages off/on via the Hide Filed link at the bottom of the pane. 
  • Appointments – This shows all active appointments on your calendar.  By default, today’s appointments are shown in blue.  Recurring appointments show only the first instance in the appointment series. 
  • Tasks and Actions – This is the place to manage all of your tasks and deferred messages.  Change the way tasks are color-coded using the Color Options link.  This will also change the color-coding for today’s appointments.  Toggle the display of completed items via the Show Completed link at the bottom right corner of this pane.  Click the checkbox next to an item to mark it complete. 
  • Status – This is a quick status of your To Do’s for the current filter.

When a filter is applied, the New Task and New Appointment buttons at the bottom of the Dashboard starts new items with the current Topic or category pre-assigned.  The Refresh button refreshes all data on the dashboard.

The Dashboard will most definitely evolve as we enhance the product.  Future iterations will pull in additional information and provide additional interactivity.  Watch the weblog for future detail.

Inbox Alert Vista Gadget Updated

We have posted an update to our Vista Gadget, ClearContext Inbox Alert.  It’s available for download from our site and should be up on the Microsoft Live Gadget Gallery sometime next week.

This update provides greater connection stability and enhances the preview pane to support Outlook 2002 and 2003 customers as well as 2007 users who aren’t running an anti-virus program.

While we’re on the subject of Outlook gadgets, the Microsoft Office Outlook team blog has details on their Outlook 2007 Appointments and Tasks gadgets, both excellent additions to your sidebar.  Check it out.

ClearContext Contact Exporter for Outlook (Beta)

ClearContext Contact Exporter

Web Worker Daily just posted about the latest release from ClearContext. Read below for more detail.

The Contact Exporter is a beta feature in ClearContext IMS v4 that lets you create and export groups of email addresses found in messages stored in the Outlook folders you select.

Select the email addresses from a prioritized list of contacts generated for you to create an Outlook distribution list, Outlook contact records, or a CSV export file.  

  • Send a group email to people on your team – Select your work or team folder and create an Outlook distribution list. 
  • Create a holiday party invitation for your friends – Select your personal correspondence folders and generate a list that you can send an email to or export to an online invitation service. 
  • Add all your business contacts to LinkedIn or your personal contacts to Facebook – Select the appropriate folders and create an export file you can upload.

Here’s a quick guide to using the Contact Exporter:

Download the latest version of IMS v4 here.  If you’re not already a ClearContext user, see our getting started page to learn more about the product.  (Note: The Contact Exporter download is in a 30-day trial of ClearContext IMS, but the Contact Exporter will remain functional after the trial period is over.)

Once you’ve installed ClearContext IMS v4.0.3 or higher:  

  1. Open Outlook and go to ClearContext > Contact Exporter from the main menu. 
  2. Select the folders containing emails you want to export contact information from.
  3. The contacts found in those folders are divided into a list divided into three groups:  More Relevant, Relevant, and Less Relevant.  Use the selection links to select/deselect groups of those contacts or the checkboxes to individually select/deselect the contacts you want to export.
  4. Check the export formats you would like for the email addresses and enter names for the files – Outlook distribution list, Outlook contact records, or CSV file.  

Once you’ve created the list, you can import these contacts into any services that accept CSV files.  Here are import links for a few popular sites (log into the sites before clicking the links below):  

LinkedIn
Facebook (click Email Application and scroll down to Contact File)
Evite
Socializr

It’s as simple as that!

Please post your suggestions/feedback/questions in our User Forums.

IMS v4.0.3 Available

We have released v4.0.3, as referenced in our updated product plan.  Changes in this release include: 

  • Improved handling of recurring appointments in the Dashboard and ActionView
  • Enhanced installation to accommodate some of the quirky Vista setup problems we have been seeing    
  • Tweaked appointments display in the Dashboard to include Day of Week    
  • A few additional minor fit/finish enhancements

Download here

Also, as part of this release, we have included a beta of the ClearContext Contact Exporter, one of the prototype projects we mentioned in our product plan.  I’m going to talk about that one in more detail in the next post…

For Newbies: Getting Started with IMS v4

We pulled together a Getting Started page for folks who are trying out the app for the first time.  If interested, here’s what we posted. Feedback is always welcome.

In just a few minutes, this will illustrate the core concepts of the IMS solution, allowing you to quickly move through your inbox and focus on working on projects.  For additional tips on best use of the product, see our Solutions Pages:

Prioritized Inbox

After install, the first time you open Outlook, IMS will analyze your email history to rank your email contacts.  Using this and other information about your email patterns, IMS will prioritize your inbox.

The setup process normally only takes a few minutes, but will take longer for large email files and inboxes.


IMS View Wizard

Once setup is complete, the inbox messages will be color-coded to highlight the most important messages.  You can select alternate custom inbox views from the ClearContext->Inbox Views menu, or at any time revert to standard Outlook views.


A Topic will be created for each folder under your inbox.  Use the Topic button or dropdown to assign topics to email.  All messages in that email conversation will be assigned that Topic. 


Convert Email to TasksCreate Appointments from Messages
Use the Task and Schedule buttons to create a task and appointment linked to your email message. 

File Message
Click File Msg to file the email directly into a Topic folder. 

Defer messages until later
Use the Defer function to move messages out of your Inbox for a specified time period. 

Use these message management functions on a number of emails in your inbox to act on your email quickly and efficiently.


IMS Dashboard

Open the Dashboard.  The initial screen will show pending tasks and appointments, as well as flagged messages in the inbox.  Select a Topic you used earlier via the dropdown or Topic button in the Dashboard.   Now, all messages, tasks and appointments with that Topic will be displayed in a consolidated project view.


Alerts, Do Not Disturb, Unsubscribe, Follow-Up, Delegate and AutoAssign are just a few of the other features within ClearContext that can be accessed in the Inbox from the ClearContext menu for a more complete evaluation of the product.

See our tutorials for demonstrations of these features.

What’s Coming Up: IMS Product Plan Update

We’ve received a ton of great feedback about IMS v4 via email and on the forums since our release a few weeks ago.  So far, our response to most of it has been “That has been added to the feature request list” or “That’s something we hope to do.” That doesn’t mean we’re not paying very close attention – we just wanted to get as much feedback as possible to help us prioritize everything in a manner that best reflects what our customers need.  Additionally, we’ve had to poke around on some of these requests to gauge the development effort required to fully implement. 

Now that we’ve had some time to gather that information, here’s a general outline of what we’re planning (subject to change, but this should be pretty close). We’re breaking things into four areas – a 4.0.x maintenance release, various prototype projects we’ve been working on for a while, a 4.x upgrade (free to all registered v4 customers), and our next major product release:

4.0.x Maintenance Release

We’ve got a point release in QA that will address a couple of issues in found in the initial v4.0 release, specifically: 

  • Improved handling of recurring appointments in the Dashboard and ActionView
  • Enhanced installation to accommodate some quirky Vista installation problems we have been seeing
  • Minor fit/finish changes

Most of these changes address minor problems reported that won’t impact existing users.

Prototype/beta projects

We’ve been working on a bunch of areas in parallel with our core IMS development.  Clues to the direction of this development are in Deva’s blog posts on the future of email, but we’re not quite ready to talk about details publicly yet.  We hope to roll out the first component along with the 4.0.x maintenance release, at which point we’ll share more information about the types of things we’re developing to leverage and extend core IMS capabilities.

4.x Upgrade

We’re planning to deliver a 4.x update in the first half of 2008.  This is going to largely address feature requests people have made around the following areas: 

  • Dashboard Display and Interactivity
  • Setup Improvements
  • Better Handling of Un-scored Messages

While some of the major components are being worked on, we’re still prioritizing a number of the specific smaller chunks of functionality to see what makes it in to this release.  We’ve created a forum thread here to get input from everyone on what your top priorities are. 

Next major release planning

We’re also in the process of scoping out and scheduling the future release plans for the next major version of IMS and other applications in the ClearContext suite of products. Much of this involves brand new functionality (related to the prototype/beta projects above) that we’ll discuss in more detail in the coming weeks and months.  On the technical side we’re working on ways to improve multi-machine support.  We’ll also continue to enhance existing IMS features, especially around areas of new v4 functionality like the dashboard.  Existing IMS areas we’re looking to improve/expand include: 

  • Improved Threading
  • Message Tagging
  • Dashboard Flexibility
  • Enhanced Automation Capabilities

We’ll have a more detailed post on this in the future, as well as a forum thread discussing the release plan.

For right now, though, our priority is making sure we get the right set of features delivered in our 4.x upgrade to improve the usability and value of new pieces of functionality such as the IMS Dashboard.  We really appreciate everyone’s feedback and pay close attention to every suggestion and forum thread.  Please post any ideas/suggestions you have there; we’ll continue to do our best to get as many of those features as possible into the product.

Updated IMS User guide

image We’ve updated our User Guide to include new features for v4, including the IMS Dashboard, Alerts, Do Not Disturb and Toolbar Management.  The downloadable PDF of the User Guide includes additional information about the IMS Daily Workflow.

IMS v4 Demo

I’ve recently made an update to our v4 demo.  Take a look:


A larger version can be found here.  If you’re interested in embedding this on your website or blog, grab this code:

<object width="425" height="350"><param name="movie" value="http://www.clearcontext.com/ims_demo/ims_demo_425px.swf"></param><embed src="http://www.clearcontext.com/ims_demo/ims_demo_425px.swf" width="425" height="350" type="application/x-shockwave-flash"></embed></object>

Thanks!

Thanks! (IMS v4 Highlights)

Wow.  I intended to put up highlights of the new release yesterday, but the response to v4 announcement has been amazing and has kept us all incredibly busy (in a good way).  A hearty thanks for the support!

For the v4 release we really focused on points of pain our customers have talked to us about in our forums and via support requests.  Here’s an overview of the key new features in v4:

clip_image001

IMS Dashboard

Accessed from the Dashboard button on the toolbar, this tool allows you to view Messages, Tasks & Appointments, filtered by Topic and Category.

When unfiltered, the messages window shows flagged messages only.  Apply a Topic filter to show Inbox and Filed messages with assigned Topics.


clip_image002

Alerts

Create an unread message or contact alert trigger by clicking the Alerts button on the toolbar.  If a message that meets the criteria set in your Alert trigger remains unread for the time you specify, IMS will pop-up a window letting you know that there is a message in your Inbox that needs attention.  A few notes:

  • You can set Alerts by contact or message thread
  • You manage/view your Alert triggers from the Alert management window, accessed via the ClearContext menu.


clip_image003

Toolbar Simplification

Probably the first thing you will notice in the new release is that the toolbar has been simplified.  Add/Remove buttons and change their position via ClearContext > Options > Preferences > Toolbar


clip_image004

Do Not Disturb

Access this feature from the ClearContext menu to turn off message notifications and work without interruption.


clip_image005

Topic Query on Save

Much like the Topic query on send function for composed messages available in v3, IMS will query for Topic assignment when a task or appointment is saved.


clip_image006

Mark as Read When Filing

IMS now marks all messages as read when filing using one of the filing buttons.  This behavior can be turned of via ClearContext > Options > Preferences > Misc.


clip_image007

Go to Topic

Accessed from the Topic Selector, Go To Topic opens the Topic folder that you select.


clip_image008

Custom Forms Support

IMS can be configured to use custom forms from the Task and Schedule buttons.  This allows the product to be used in conjunction with third party add-ins like Taskline.  Enter the custom form class in ClearContext > Options > Preferences > Tasks/Appts.  FYI – To use Taskline, enter IPM.Task.Taskline in the Task custom form field.


Thanks to the beta community who helped us test the new
features!

We’ve got a lot more to talk about in conjunction with this release.
In particular I want to share our near term product plan and talk at length
about the Information
Management System Daily Workflow
.  So watch the weblog over the coming
weeks for some really exciting stuff.