Posts categorized “product”.

v4.6.4 Available for Download

We just released a minor update to ClearContext for Outlook.  v4.6.4 addresses the following:

  • Fixed a calendar display issue
  • Fixed a problem in the selection of Topic assignment preferences
  • Changed the Response Time score to accurately handle low volume

Please download and upgrade at your convenience.  This is a complimentary upgrade for all registered v4 customers.  You do not need to uninstall prior versions before upgrading.

ClearContext v4.6 Available for Download

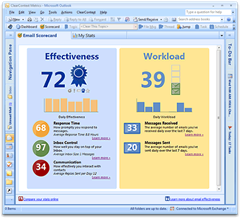
scorecard_580pxToday we’re releasing a significant update to ClearContext Personal and Pro.   v4.6 is available for download now at www.clearcontext.com.  Thanks to everyone for contributing feedback and helping out with the beta program for this release.  Please download and let us know what you think!

This release is focused around two main areas of improvement:

  • The first is a sneak preview of ClearContext measurement of email statistics, metrics, and effectiveness.  We’ve added an Email Scorecard and Stats module inside Outlook as an introduction to this new feature area, but a lot more is coming very soon.  Watch the blog for more detail.
  • The second focus area is a large set of feature enhancements, performance improvements, and bug fixes.

Here are the highlights for the v4.6.3 production release:

Brand New Features

  • Email Scorecard – Learn more here
  • Jump to Topic button

Feature Enhancements

  • MessageContext and FolderContext on/off preferences
  • Notification Managers location
  • Toolbar Defaults
  • Dashboard Message sorting
  • Dashboard Tasks filtering
  • FolderContext Sorting Preferences
  • Topic Assignment defaults

Compatibility and Performance Improvements

  • Sent Messages & Exchange NDR issue fix
  • Enhanced Add-in Compatibility
  • Asynchronous MessageContext
  • Non-Supported Mail File Check (for Oracle Beehive customers and others)
  • Performance improvements

For more detail and discussion around this release and a list of additional bug fixes, please see this forum post.

Thanks again, and we hope you enjoy the new release!

Topic Conversion Tutorial

See our Topic Conversion tutorial for tips on filing outside Exchange, changing your Topic folder location, and adding a secondary PST for Topic storage:

Watch a larger version here or embed via YouTube.

Project Management Tutorial

We morphed the Task & Calendar Management tutorial into a brief (1:40 min.) introduction to personal project management in Outlook, covering Tasks, Appointments, MessageContext, and both dashboards:

Watch a larger version here or embed via YouTube.

Views & Prioritization Tutorial

The updated Views & Prioritization tutorial teaches the use of prioritized views, contact prioritization, and message prioritization:

Watch a larger version here or embed via YouTube here.

Topics & Filing Tutorial

The updated Topics & Filing tutorial talks about suggested Topics, the Topic Selector and filing to Topic Folders:

Watch a larger version here or embed via YouTube.

Quick Tips Tutorial

We are updating our video tutorials to reflect the latest release.  The first one, Quick Tips, covers Defer, Unsubscribe and Follow-up:

Watch a larger version here or grab an embeddable version at YouTube.

User Guide: Project Dashboard (Pro Only)

The Project Dashboard displays all messages, appointments, contacts, attachments, tasks and deferred messages by Topic and category.

IMS Dashboard: Manage projects in Outlook

OPen Project DashboardOpen a Project Dashboard tab from the Summary Dashboard by selecting a Topic in the Topic Summary and double-clicking or pressing Open Topic. 

To close a Project Tab, click the X on an active tab.

Title Bar   
The Project Dashboard’s title bar provides more advanced views of your Projects:

  • Explorer Icon Dashboard Click the Attachment Explorer icon to open a new tab displaying all of the attachments associated with this Topic.
  • Jump to Folder The Jump to Folder icon takes you to the folder associated with this Topic.
  • Show Sub Folders Toggle Show Sub-Folders on to include sub-Topics in the Project Dashboard.
  • Filter your information by category with the category drop down.Categories

Messages   
The Messages pane shows all messages in the Inbox and the Topic folder for the selected Project.  Double-click a message to open it.  Select a message and use the Actions button to act on it (Reply, Forward, Delete, Task, Appointment).  Select Jump to Folder to open the Topic folder for this Project.  By default, ClearContext only loads the most recent 1,000 messages for the selected Topic.  When this limit is in effect, click the Show All link at the bottom of the pane to load all messages in the Topic.  Use the Hide Filed link to display Inbox messages for this Topic only.

Appointments   
The Appointments pane shows all active appointments for this Topic.  By default, today’s appointments are in blue.  The pane will only show the next instance of a recurring appointment.  Double-click an appointment to open it and use the Actions menu to delete the current appointment or create a new appointment with this Topic pre-assigned.

Contacts   
The Contacts pane shows all Contacts in the To: and From: fields for messages that appear in the Messages pane.  See FolderContext for more information on working with the Contacts list.

Attachments   
The Attachments pane shows all attachments found in the messages that are displayed in the Messages pane.  See FolderContext for more information on working with the Attachments list.

Tasks and Actions   
The Tasks and Actions pane shows all tasks and deferred messages associated with this Topic.  Double-click an item to open it.  Mark tasks complete via the check box.  Click a header to sort the information in this pane.  Select Actions to delete a task or create a new one with the current Topic pre-assigned.  Items are color-coded by due date.  Adjust color display options or toggle the display of completed items using the links below this pane.

Global Buttons   
There are three buttons at the bottom of the Project Dashboard:

  • New Task starts a task with the current Topic pre-assigned.
  • Similarly, New Appt starts an appointment in the current Project.
  • The Refresh button reloads all data in the Dashboard.

Jump to Dashboard

Jump to DashboardWhile in a Topic folder, quickly open a Project Dashboard by selecting Actions > Jump to Dashboard from within FolderContext.


The complete ClearContext Personal and Professional User Guide, including a downloadable PDF, is available here.
User Guide: Summary Dashboard (Pro Only)

Divided into four panes – Topics, Notifications, Tasks and Actions, and Appointments – the Summary Dashboard provides a control panel for your workday.  Open the Dashboard by pressing the Dashboard button on the main toolbar.  To close it, click on another folder, such as the Inbox, or another area in Outlook, such as the Calendar.

Summary Dashboard

Topics   
The Topics pane shows a summary of all of your Topics, along with counts of today’s appointments and tasks that are overdue, due today or due this week.

  • Type a Topic name in the filter to narrow the list of Topics down
  • Click Open Topic to launch the Topic Selector and open a Project Dashboard in another tab.
  • Select Active Topics Only to display only those Topics that have active items in them.
  • Double-click any Topic in the list to drill down to a Project Dashboard tab.

Notifications   
The Notifications pane shows a summary of all active Notification Managers.  For more details on this functionality, see FolderContext.

Tasks and Actions   
This is a global list of all of your Tasks and Deferred items in Outlook.  Double-click an item to open it.  Mark tasks complete via the check box.  Click a header to sort the information in this pane.  Select Actions to delete a task or create a new one.  Items are color-coded by due date.  Adjust color display options or toggle the display of completed items using the links below this pane.

Appointments   
The Appointments pane shows all active appointments.  By default, today’s appointments are in blue.  The pane will only show the next instance of a recurring appointment.  Double-click an appointment to open it and use the Actions menu to delete the current appointment or create a new appointment.

Buttons   
There are three buttons at the bottom of the Summary Dashboard:

  • New Task starts a task.
  • Similarly, New Appt starts a new appointment.
  • The Refresh button reloads all data in the Dashboard.

Get the Most Out of the Dashboard

The Dashboard is the crux of the Succeed component of the ClearContext process, allowing you to view all of your Outlook information by Topic or Category.  To take full advantage of this functionality, instruct ClearContext to query for Topic assignment to Messages, Tasks and Appointments as you create them.

The complete ClearContext Personal and Professional User Guide, including a downloadable PDF, is available here.

User Guide: Contact Exporter

The Contact Exporter lets you create and export groups of email addresses found in messages stored in the Outlook folders you select.

Contact Exporter

Select the email addresses from a prioritized list of contacts generated for you to create an Outlook distribution list, Outlook contact records, or a CSV export file.   

  • Send a group email to people on your team – Select your work or team folder and create an Outlook distribution list. 
  • Create a party invitation for your friends – Select your personal correspondence folders and generate a list that you can send an email to or export to an online invitation service. 
  • Add all your business contacts to LinkedIn or your personal contacts to Facebook – Select the appropriate folders and create an export file you can upload.

To use the Contact Exporter:

  1. Go to ClearContext > Contact Exporter (Personal) or ClearContext > Tools > Contact Exporter (Pro) from the main menu. 
  2. Select the folders containing emails you want to export contact information from.
  3. The contacts found in those folders are divided into a list divided into three groups:  More Relevant, Relevant, and Less Relevant.  Use the selection links to select/deselect groups of those contacts or the checkboxes to individually select/deselect the contacts you want to export.
  4. Check the export formats you would like for the email addresses and enter names for the files – Outlook distribution list, Outlook contact records, or CSV file.

Import Contacts into Popular Websites

Once you’ve created the list, you can import these contacts into any services that accept CSV files.  Here are import links for a few popular sites (log into the sites before clicking the links below):   

The complete ClearContext Personal and Professional User Guide, including a downloadable PDF, is available here.