This release includes the following improvements and fixes:
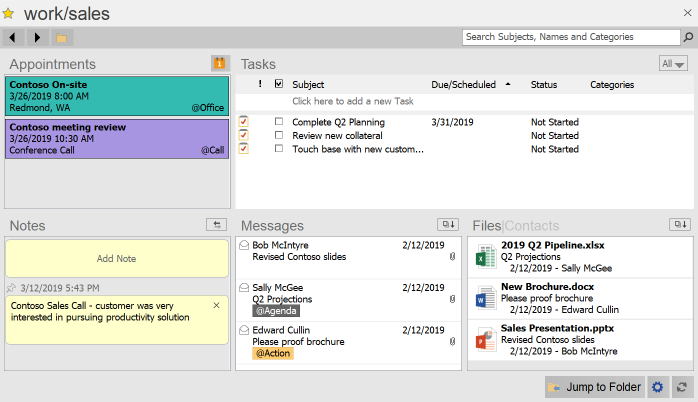
Project Detail Dashboard: new Messages window that shows associated Project emails that have been filed or are pending in the Inbox. *available only in standard Project folder filing mode
Category Colors: displayed category labels now show the Outlook color category coding in the Dashboard and Organizer.
Automatic Updates: rework download mechanism to increase compatibility with firewalls/security settings
Misc: various updated graphics
Bug Fix: prevent creation of duplicate filing suggestions in certain situations
The update is being delivered now to users on the beta/early update channel, and is scheduled to go out to all users in the next few weeks. The build number in the About screen will show as 1901.00.
A product update is rolling out with the following improvements and fixes:
Project/Folder selector: added additional larger width options. Window width is selected with the << and >> buttons
Project/Folder move/rename: the move function can now process entire Project/Folder trees in one step, instead of having to modify them one at a time.
Setup: new streamlined one step process for setup
Setup: unified 32/64 bit installer
AutoFile: bug fixes to address certain cases where incorrect options set for drag and drop creation, and to prevent scanning Inbox when rule changed while AutoFile is disabled
Startup: Add button to manually close Intro screen
The update is being delivered now to users on the beta/early update channel, and will be going out to all users within the next few weeks.
A product update has been released with usability improvements for the Dashboard. Pending tasks that are due or overdue will now show up in the main task list as well, so that they are not accidentally overlooked. Also, in applicable views/filters, higher priority tasks will now be ordered before lower priority tasks of the same date and a new appointment button has been added to the Project Detail window.
Additional changes include improvements in the Project/Filing suggestions and the addition of higher resolution images in the Ribbon toolbar for improved clarity in zoomed or high density displays.
An update is rolling out to all users that adds a Delay Filing option to the AutoFile feature:
When the Delay Filing option is selected for a rule, the target Project is assigned and labeled to matching Inbox messages, but the message is not immediately filed.
This option is useful for when you want messages categorized to a certain Project right as they arrive, but you want to file it yourself later.
* This option is applicable only to rules that assign/file messages to your Project folders, and not rules that file to the folders within the special ClearContext Autofiled folder
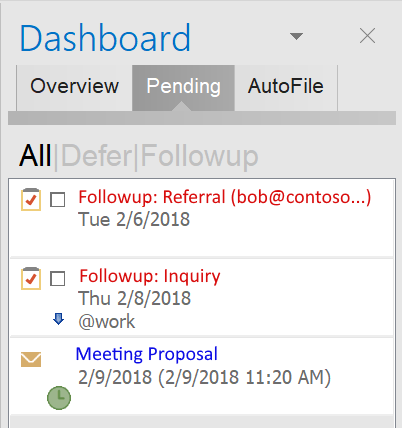
Just a quick note to announce the production release of the Pending Tab for the Dashboard. The new Pending functionality streamlines the main Dashboard task list to those are actionable and moves Followup and check later type to-dos to the Pending list. See full details in our previous notes here and here.
The update is rolling out to Beta and Early Adopter channels now and will continue with all users shortly.
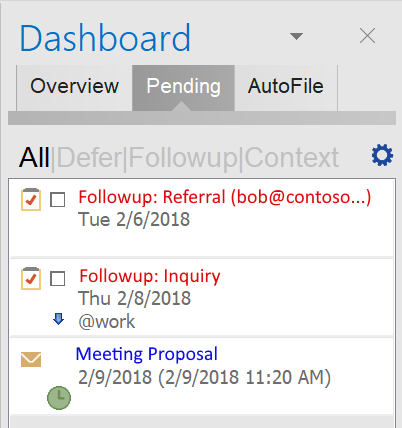
We have decided to do one more quick beta update as a new capability has been added to the new Pending functionality. Tasks tagged with specific context categories can now be listed in the Pending tab and excluded from the regular Dashboard task list.
By default, tasks with an @pending category will be managed in the Pending list. The context categories used for the Pending list can be customized by clicking on the gear icon in the Pending tab. Commonly used GTD categories such as @waiting or @someday may be ones that you want to define as Pending categories.
Unless we encounter any unexpected difficulties, this beta version will be transitioning to production later this month.
A Beta preview is available for the new Pending tab in the Overview Dashboard. The Pending mode allows for the separation of tasks from the Dashboard that are actionable now versus ones that are awaiting some trigger in the future. This separation de-clutters the to-do list and focuses it more on things that can be worked on. In addition, the Pending list provides a place for Deferred messages to be monitored.
Followup tasks have been relocated to the Pending area. If awaiting a specific response, the pending email contact is listed in the subject line as well. The task can be interacted with in the same way as the Overview tab by marking complete, double clicking to open, or right clicking for other actions. If the Followup is automatically cancelled due to a response, it will no longer appear here.
Deferred messages that were snoozed and are awaiting return to the Inbox can now be viewed here. The date field shows the scheduled return date as well as the message received time. Previously, the only way to see the pending Deferred messages was to look through the Deferred message storage folders.
Users who have opted in to the Beta update channel are being automatically updated to this beta preview. If you would like to try this preview, please go to your ClearContext Account screen in Outlook and enable the Beta tester updates. Then for an immediate update, select the check updates link in the ClearContext->About screen.
We look forward for your feedback, and please feel free to comment below or directly to support.
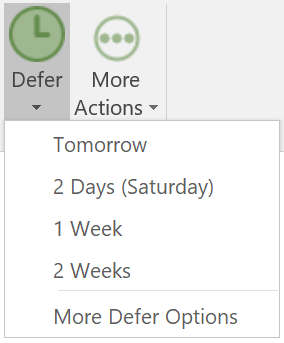
The latest update includes improvements to Defer and Followup:
Defer
A new One-Click Defer capability has been added. When enabled, clicking the Defer button immediately defers the selected message for a pre-configured amount of time. In addition, the button in the toolbar/ribbon is split into 2 sections – the One-Click Defer button and a down arrow that is used to access other Defer options. This option may be enabled by clicking on the Show Options button in the Defer window.
Followup
A task priority option has been added to Follow-up options so that a low or high task priority can be applied to Follow up tasks
This update is rolling out to users on the Beta or Fast update option (this option is accessible in the ClearContext Account screen in Outlook), and will be rolling out to all users shortly.
The latest update adds the ability to quickly view Project/Category Tasks and appointments in the Summary Dashboard. For full review and management of Projects, the Detail Dashboard is more powerful and capable. However, for a quick review of status or to-dos, these new quick access modes offer a easy and lightweight way to view Project/Category items.
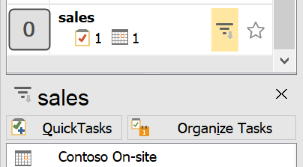
The first quick access mode is through a filter button added to the top list of Projects and Categories. Hovering the mouse over an item in the upper list will display a filter button, which when pressed will filter the list of lower list of Tasks and Appointments. Clicking on the X button or the same filter button again will revert back to the normal view.
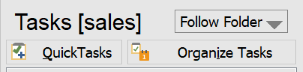
The second mode is a new Follow Folder view available in the lower item list. When this option is selected, the list will automatically filter to the Project associated with the current folder viewed in Outlook. For example, if the folder “sales” is being viewed in Outlook, the list will show only Tasks and Appointments for the “sales” Project, and the header will reflect that status. If the current folder is not associated with a Project, such as the Inbox, then the list will revert to showing all items.
Note that this view can be used in conjunction with the Jump to Folder function in ClearContext to provide super quick one step access to your Project emails and to-dos! (ALT-j for you keyboard shortcut fans)
* For the single folder/Processed Mail filing mode, the Follow Folder view has no effect and is equivalent to the All view
This update is rolling out to users on the Beta or Fast update option (this option is accessible in the ClearContext Account screen in Outlook), and will be rolling out to all users shortly.