Our last post gave an overview on using ClearContext IMS Pro with Getting Things Done. Our next excerpt from the setup guide Using ClearContext IMS Professional for Microsoft Outlook with Getting Things Done is on Action Management.
Action Management
Following Allen’s advice, the bulk of your email messages (those that you can’t answer in two minutes, delete, or file away for reference) will become tasks or appointments in your trusted system. IMS Pro’s Task, Delegate and Schedule buttons allow you to quickly create tasks and appointments from email messages. Assign Outlook categories to these items to denote context, ensuring that they are assigned to the appropriate action list.
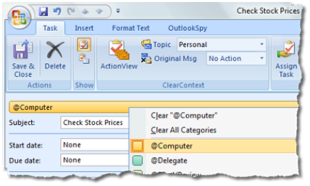
Category Assignment in Outlook 2007
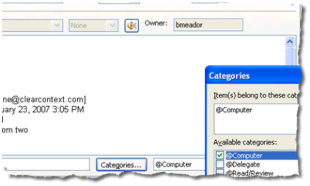
Category Assignment in Outlook 2003 and Earlier
Setup
The first step in setting this up, customize your Outlook Master Categories list to include the action list categories you use as you process your Outlook information. Putting the ‘@” symbol in front of each description will ensure that these display at the top of the categories list. We realize that this is a very personal list that each user will want to tweak for his/her on working style. Examples of common categories many of our customers have found useful include:
@Car
@Delegate
@Desk
@Home
@Internet
@Phone
To customize the category list in Outlook 2003 and earlier:
1. Open a new task or appointment
2. Click the categories button in the lower right hand corner
3. Click the Master Category list button
4. Edit the list as desired
To customize the category list in Outlook 2007:
1. Right click the category color field on an email, task, or appointment
2. Select the “All Categories…” menu item
3. Click New and add a category
4. Optionally add a color code
5. Repeat for each category
Processing
Once this setup is complete, process the inbox using the IMS workflow buttons, answering those emails that you can, deleting those that you don’t need, filing reference material using IMS File buttons, and creating tasks or appointments for future work. As tasks and appointments are created, assign a context using Outlook’s native category assignment feature and one the categories created above. This will automatically associate the item with the appropriate action list.
The "Tickler" File
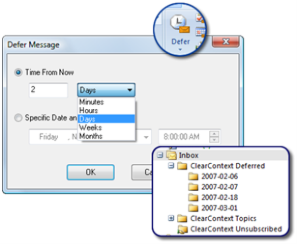 Many GTD’ers follow Mr. Allen’s suggestion of creating a “tickler file.” ClearContext’s Defer button is an excellent way to maintain an electronic version of this file. The Defer button moves an email out of the inbox and schedules it as unread at a given time interval or on a given date.
When a message is deferred, a dated folder is created as a subfolder of the “ClearContext Deferred” folder. Consider these your tickler files. Click on any day’s folder to review upcoming items or simply wait for the message to re-appear in your Inbox as scheduled. For example, say you receive an invite to a corporate networking event on the 25th. It’s still three weeks off and you don’t need to RSVP until the day before. Click Defer and “schedule” the message for the 24th. The message is moved into a subfolder with the month and day you have designated. You can click on this folder at anytime to see all messages pending for that day. Alternatively, the message automatically re-appears in your Inbox, unread, on the 24th, reminding you that you need to make a decision about the event.
[Our next post in the GTD series will be on Project Designation. Download the entire guide here.]
GTD and Getting Things Done are registered trademarks of David Allen & Company. ClearContext Corporation is not affiliated with David Allen & Company in any manner.