Our last post detailed Project Designation using ClearContext IMS Pro with Getting Things Done. Our next excerpt from the setup guide Using ClearContext IMS Professional for Microsoft Outlook with Getting Things Done is on Review.
Review
Once the Inbox has been processed, IMS provides several methods for reviewing and acting on To-Do Lists.
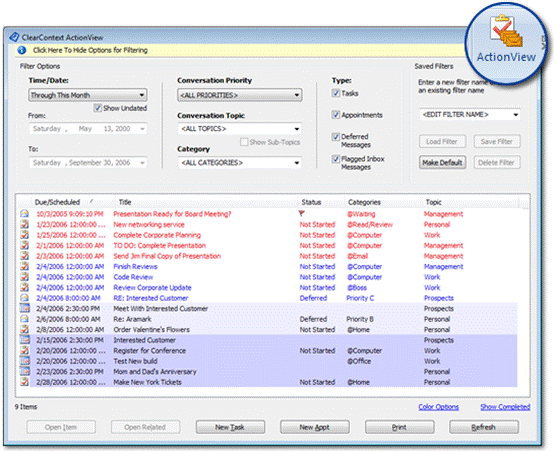
To view action items, select the ActionView button on the ClearContext toolbar and filter the results by category. This is your Action List – it shows all open tasks and appointments for the given context. Further refine the results by filtering by priority, topic, or date range. Show/hide filtering options by clicking the yellow information bar at the top of the ActionView.
Create pre-defined filters for lists that you review periodically. For example, to create a filter to show all of the tasks you need to perform when you are ready to work at your computer:
- Open the ActionView and press the yellow information bar to open filtering options.
- Select the category @Computer from the drop down in the middle of the options.
- Under saved filters, type a filter name in the drop down (where it initially says <DEFAULT> or <LOAD FILTER>).
- Click Save Filter.
The next time you are at your computer, select the newly created filter from the drop down and click Load Filter to open all of your To-Do’s assigned a category of @Computer.
Weekly Review
Many GTD users find David Allen’s suggestion of a weekly review to be the most critical component of their GTD implementation. To automate the weekly review with ClearContext IMS, use the ActionView and ClearContext’s custom Inbox views to process actions by project. To perform the review, use these tools on a weekly basis:
- Select the ClearContext Prioritized By Week view (ClearContext > Inbox Views > Prioritized by Week), go through the email remaining for the last week and action it using Task, Schedule, Delegate, Defer or Delete.
- Select the ActionView button on the ClearContext toolbar. This creates a list of all Tasks, Appointments, and Deferred messages in the mail file.
- Use Filter By Date to review the last week’s tasks and appointments and take action or mark complete as appropriate. Optionally filter by category (action), topic (project), or priority.
- Change the filter to review future tasks, appointments, and deferred messages. Capture any new actions that come to mind using the buttons at the bottom of the ActionView dialog.
- If filtering by category or project, repeat for each item on these lists.
- Review the Someday/Maybe folder and transfer any items to your system that have become active or delete any items that are no longer relevant.
RelatedView
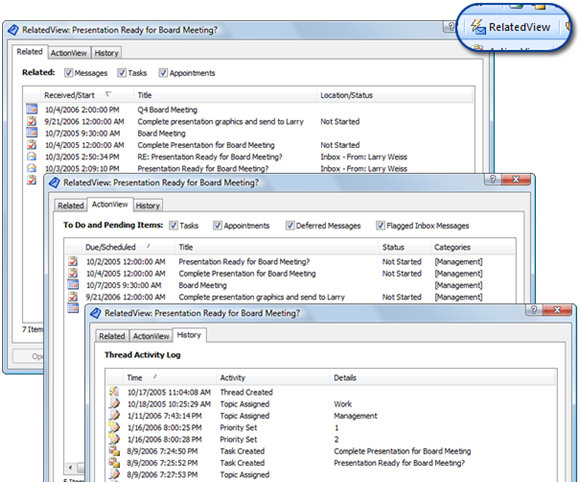
The RelatedView is a view of all related items for a given conversation. For example, your Inbox is empty and you receive a new message regarding a meeting you are attending later in the week. Click the RelatedView to see previous emails about this meeting, along with any tasks or appointments created from the conversation. In Outlook 2007, the RelatedView is integrated into all messages, tasks and appointments.
For Advanced Outlook Users: Creating Custom Task Views that Include the Topic Name
The ActionView is the quickest way to view all To Do items, including Tasks and Appointments, by Topic name. If desired, the Topic name can be added to custom task views so that tasks within the native Outlook task pane can be sorted by project as well. To add Topic to a Task view:
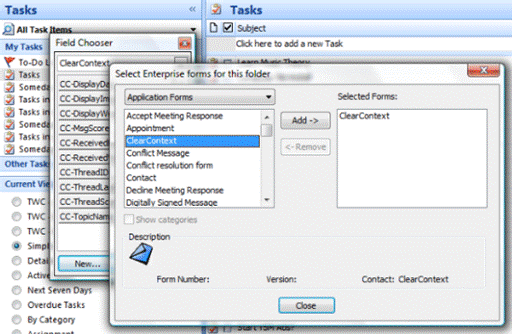
- Go to the task pane and click on the view that you want to alter.
- Right click the header on the tasks list (i.e. where it says Subject, Due Date, etc.) and select "Field Chooser."
- Select "Form…" in the drop down where it says "Frequently Used Fields:"
- In the "Select Enterprise forms for this folder" dialog select Application Forms.
- Highlight ClearContext and press Add…
- Close the current dialog.
- In the Field chooser, add CC-TopicName by clicking it and dragging it to the headers you initially right clicked.
- Exit out of the field chooser.
- If desired, change the name of the header on this field by right clicking CC-TopicName, selecting Format Columns, and changing the Label.
- Repeat for each view that you want to alter.
[Our last post in the GTD series will be on Prioritization. Download the entire guide here.]
GTD and Getting Things Done are registered trademarks of David Allen & Company. ClearContext Corporation is not affiliated with David Allen & Company in any manner.