If you are trying out the ClearContext ActiveWords agent for the first time, I have developed a quick script that will step you through some of what integration of the two applications offer. Try it out to see huge productivity gains as you manage your email.
- After installation of ClearContext, the first thing you should do is find a view that works for you. The default views present a color coded inbox, ordered by priority. Check out our downloadable views page and see if there is a view that suits your needs better. I’m partial to the Group By views, which look exceptional in Outlook 2003, but many new users prefer the more traditional Received By view with color coding. (FYI – we will enhance the view selection process in our v2.0 release).
- If not already completed, install the ActiveWords ClearContext Agent. Follow instructions here.
- Make two configuration changes to get the most out of this setup:
- Click "Save Sent Messages" in ClearContext Options – Tools > Options > ClearContext > Preference – this will ensure that all categorized sent messages will be filed in ClearContext Topic Folders. (Look here for more information).
- If you have MS Word enabled as an editor, turn it off (our open message toolbar will not function with Word as an editor). Tools > Options > Mail Format – uncheck "Use Microsoft Word…" (For more information see here).
 Create a few ActiveWords that map to ClearContext "Topics" – categories that you would like to tag to messages and file email under. For example:
- Trigger ‘ccwizard‘
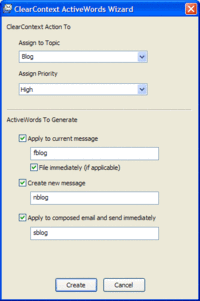
- In the dialog, create three new active words that assign the topic "Blog" and priority "High" to email messages – one that files the message, one that starts a new message, and one that sends the message (see screen print)
- To see the results:
- Open a message that you would like to file in the Topic Folder "Blog". Trigger ‘fblog’. We will assign the topic "Blog" and a priority of "High" and automatically file the message under Inbox\ClearContext Topics\Blog. All future messages in that email conversation will automatically be tagged with "Blog" and "High". In addition, any messages presently in your inbox that are part of that conversation will reflect these values.
- Trigger ‘nblog’ – a new message is started with priority ‘High’ and topic ‘Blog.’ Complete your message and send. As above, all future and present email messages in that conversation are automatically prioritized as "High" and tagged with "Blog." In addition, because you enabled Save Sent Messages in ClearContext Options – this sent message is saved in the ClearContext Topic Folder (Inbox\ClearContext Topics\Blog) rather than the Sent Messages folder.
- Compose a new message as you normally would. Instead of hitting the send button, trigger ‘sblog.’ The message is automatically prioritized and categorized prior to sending and saved in the associated ClearContext Topic Folder. All future messages are tagged with topic "Blog" and priority "High."
- Finally, now that you can see how topics work, use Topic Assignment in conjunction with our filing buttons to rapidly categorize and file messages in your inbox. For example, find a long email conversation in your inbox that you would like to archive. Assign a topic to it from the Topic drop down list box on the ClearContext toolbar (or trigger ‘topic‘ on the message and enter a topic name or run ‘ccwizard‘ and create an ActiveWord that merely assigns a topic without filing…). Now select Alt-D to file the message thread. All messages in that email conversation are filed in the associated ClearContext Topic folder (Inbox\ClearContext Topics\{Topic Name}).
Once you get used to assigning topics and priorities to your messages, inbox management becomes a much easier animal. Using ActiveWords to do this greatly enhances the way you approach these tasks – making it a snap to proactively categorize and file email.