 In our last post introducing ClearContext v6, we talked about the focus on flexibility and efficiency for this new release. Here is a brief description of some of the enhancements in version 6:
- Refreshed and streamlined user interface for ClearContext windows and toolbars
- Inbox and sent mail processing for multiple email accounts. Prioritization and automated actions such as AutoFile will now be supported in multiple mail files.
- Unicode support to properly handle multi-byte languages
- Performance improvements for Project selection to support thousands of entries
- Dynamic creation of ClearContext folders so they do not appear if unused
- Addition of Google Apps to supported configurations
- Addition of “Window 8” to supported configuration
- Other enhancements for multiple mail file support and configuration
In addition to these highlights, ClearContext v6 will also incorporate many other tweaks and enhancements to improve usability or address known issues. Some of these come from our own lists and planning, and many will come from feedback during testing from our Connect members.
As we mentioned previously, access to the v6 beta will be an exclusive benefit for Connect members. If you would like to check your membership status, please visit our Connect Subscription Status page. Also, you should be receiving a special offer in your inbox if you need to subscribe to or renew Connect. If you do not receive this email, please send an email to sales@clearcontext.com and we would be happy to add you to the mailing list.
Posted by frank at 10:29 am on December 15th, 2011.
Categories: clearcontext, ims, product.
With the release of v5.4.5 last week, we are reaching the end of our 5.x release cycle and are now preparing for the v6 launch. Since the initial release of v5.4, we have released a number of minor updates, most of which were fixes to specific issues not impacting most users.
We’ve received inquiries asking about what specific changes have been incorporated into these maintenance releases. As we transition into v6 development, we thought it would be a good time to do a wrap-up of these changes in the v5.4 maintenance releases:
V5.4.5
- Automatically detect a loss of connection to Public Folders and attempt to restore the connection
- Use different icons in the Project selector for Public Folders to better distinguish them from local folders
- More effective deletion of Project suggestions from the Edit Suggestions function
V5.4.4
- Fix a stability issue when using Word as an editor for composing emails in Outlook 2003
- Prevent a rare problem of a loss of connection to the suggestion database in Outlook 2010 while running
- Filter out disabled AutoFile Groups in the AutoFile create rule window
- Adjust Windows XP Theme detection to prevent UI color mismatches in certain environments
- Translate Exchange addresses to more readable email addresses when creating Tasks/Appointments from messages
- Fix crash when contact support button is pressed on severe error dialog before the application is initialized
V5.4.3
- Fix issue where categories are not saved in task creation from Dashboard when Project to category synchronization is disabled
V5.4.2
- Fix issue with suggestions database where version was not being incremented
V5.4.1
- Fix stability issue with loading recurring Appointments from the MessageContext
- Set defaults for Dashboard in the TWC version
- Allow selection of !next category in Organizer review
The latest version of ClearContext is always available by downloading from clearcontext.com.
Posted by frank at 12:57 pm on November 22nd, 2011.
Categories: clearcontext, ims, product.
Since early releases of ClearContext, we’ve always had a significant group of passionate users who are also fans of productivity systems like Getting Things Done and Total Workday Control. We’ve had a special build customized for our TWC users for a while. We’re now pleased to announce the release of ClearContext Pro v5.4, which includes some much-requested features to better support our GTD users as well.
 GTD users and other users who organize their tasks using special Outlook categories can download a GTD setup guide for ClearContext with detailed setup instructions. Here’s a quick overview of some key features to help GTD users stay organized with ClearContext:
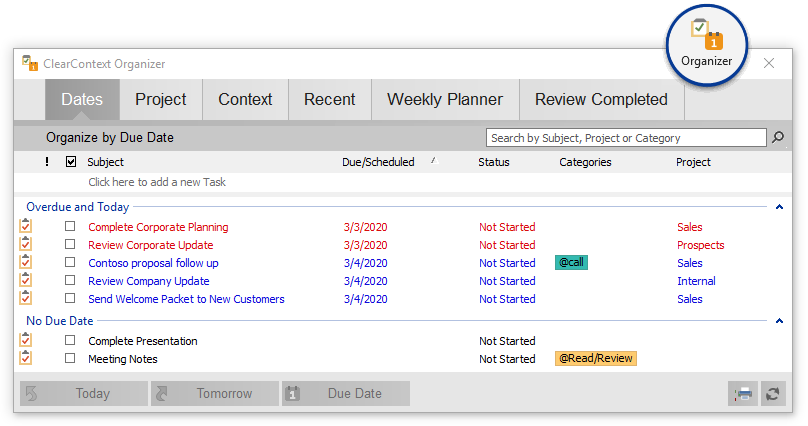
- Context Categories – You can now manage your tasks based on either categories or projects. Select a category view on the ClearContext Summary Dashboard to display a count of tasks and appointments by context category in the dashboard, highlighting due and overdue categories. Context categories are denoted by a special character in front of the category name (i.e. @Calls, !Next, *Phone).
- Category Dashboards – Double-click a context category on the Dashboard to open it in the Detail tab (formerly the Project tab). This will show all tasks and appointments with the assigned category. Add new tasks to the category using the Add Task function on the detail dashboard and ClearContext will automatically append the current context category to the task.
- Next Actions - Right click tasks in the Dashboard or Organizer to mark them as Next Actions. A small arrow will appear next to those items you have identified as Next and a category of !Next will be assigned to the task. Use the Next Action filter on your task list in the Dashboard to see only those tasks marked !Next.
More details on these and other GTD-related features can be found in the GTD setup guide.
 The v5.4 upgrade is complimentary for registered v5 customers, registered v5-TWC users and active Connect members. Download here.
GTD and Getting Things Done are registered trademarks of David Allen & Company. ClearContext Corporation is not affiliated with David Allen & Company in any manner.
Posted by brad at 7:03 pm on March 8th, 2011.
Categories: announcements, gtd, product.
v5.3 adds the ability to quickly add tasks from the Organizer. Create new tasks on the fly via the Add Task box at the bottom of the window of the pane. Type the task subject and press ENTER to create the task with a date of today. If you have instructed ClearContext to ask for a project assignment on save, the project selector will appear. Assign a project or date via the options to the right of the Add Task text entry field. For more detail, see our User Guide.
Posted by brad at 11:24 am on February 11th, 2011.
Categories: product, tips.
There are several new enhancements to AutoFile in our v5.3.0 release. Here are a few excerpts from our User Guide on the changes.
 Domain Rule Creation
Highlight a message and press the AutoFile button on the toolbar or select AutoFile from the ClearContext menu. In the dialog that appears, choose whether you want to create a sender-based rule (i.e. bacn@bulksender.net) or a domain-based rule (i.e. bulksender.net) and select the group you would like to file to. All messages in the current folder that match your rule will be filed to the group you selected. All future messages from that sender or domain will be filed as well.
Renaming AutoFile Groups
Open ClearContext > Options > AutoFile to configure the service. Highlight a filing group and click Change Name to rename a filing group.
Posted by brad at 10:22 am on February 10th, 2011.
Categories: product, tips.
 We’re pleased to announce the release of ClearContext v5.3.0 to production! This release adds functionality that many of our customers have been asking for; including Next Action support for those who use the GTD system and AutoFile support for renaming and creating domain rules. Detailed features include:
Personal and Pro
- Rename AutoFile filing groups via ClearContext > Options > AutoFile.
- When creating an AutoFile rule, you are now given the option to select a sender or domain based rule.
- Disabled filing groups with no unread messages are hidden from the AutoFile group list in the Dashboard.
- Miscellaneous other performance enhancements.
Pro Only
- Right click tasks in the Dashboard or Organizer to mark them as Next Actions. A small arrow will appear next to those items you have identified as Next and a category of !Next will be assigned to the task.
- Projects with Next Actions assigned will show a small arrow next to them in the Summary Dashboard.
- Use the Next Action filter on your task list in the Dashboard to see only those tasks marked !Next.
- Quickly add a task via the new Add Task feature at the bottom of the Organizer.
Take a gander at our updated GTD setup guide for more detail on incorporating Next Actions into your workflow. The User Guide has been updated as well.
The v5.3 upgrade is complimentary for registered v5 customers, registered v5-TWC users and active Connect members. Download here.
Posted by brad at 11:57 am on February 8th, 2011.
Categories: product.
We have released v5.2.2 to improve the email statistics included in the daily digest. Upgrade here.
Posted by brad at 2:59 pm on December 16th, 2010.
Categories: product.
We have released a minor update – v5.2.1 – with a few installer enhancements. To update to the latest, download here.
Posted by brad at 2:12 pm on December 8th, 2010.
Categories: product.
 Dave Johnson at BNET had this to say about ClearContext Personal:
“Here’s a tool that can help you take back control of your inbox, automatically, without setting up lots of rules or filters. The amazing thing? It actually works.”
Simon Mackie at Web Worker Daily writes:
“It automatically files unimportant emails, like social network notifications, newsletters, e-commerce emails, and other automated “bacn”, into categorized groups, taking it out of your inbox.”
For more information on the new release, see our announcement:
“ClearContext Personal makes that information easier to deal with by doing three things:
- Automatically filing unimportant messages out of your inbox to deal with later
- Creating a daily digest of all autofiled email, so you never lose any information
- Highlighting email from important senders in your inbox without any confusing rules or training
Posted by brad at 7:06 pm on December 3rd, 2010.
Categories: product.
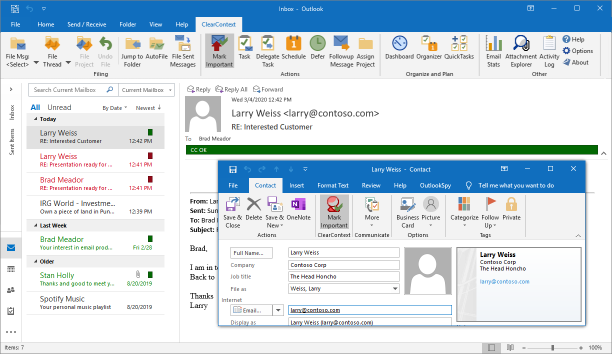
In the contact analysis process performed during setup, ClearContext’s prioritization algorithm automatically identifies those contacts that you email the most and marks them as important. ClearContext uses this contact priority to highlight emails in the Inbox from your most valued contacts. Manually mark email important via the Mark Important button on the toolbar.
CC VIP
 During initial setup, ClearContext analyzes email history to determine email addresses from which you send and receive the most email. Using this information, your VIP contacts are marked as important. By default, email received from these contacts are marked with category CC VIP and color-coded red. Manually mark/un-mark a message as a VIP using the Mark Important button. This will automatically adjust the contact priority and future messages will reflect the change.
CC OK
 All messages from known senders are marked with category CC OK and color-coded green. These include messages from contacts that are in your address book – but not marked important – and messages from contacts that are not in your address book but are replying to conversations that you have already participated in.
Contact Priority
 Also adjust priority via contact records. Open the contact for an important sender and press Mark Important. All future messages from this sender will be designated CC VIP.
Views
In Outlook 2007 and later, ClearContext color codes messages using Inbox category colors. In Outlook 2003, ClearContext changes the font color to indicate priority. To see font color coding in other versions of Outlook, select a ClearContext view from the Outlook view menu (View > Current View). There are three views installed during setup:
- ClearContext By Date – messages ordered by received date
- ClearContext Threaded – messages grouped by conversation and ordered by date
- ClearContext Prioritized by Category – messages grouped by category
If you change options below, the views above may no longer color code by priority.
Posted by brad at 8:26 am on December 1st, 2010.
Categories: product.