The Contra Costa Times ran a story by Laura Casey on the supposed death of e-mail. ClearContext CEO Deva Hazarika is quoted:
In fact, e-mail is only becoming more important for working professionals, says Deva Hazarika of ClearContext of San Francisco, a software company that helps people organize all the information that flows through e-mail.
…
"People need information to be traceable. They need to look back at information. That’s why all of important conversations are pretty much staying with e-mail right now," Hazarika says. "E-mail is really not only sticking around, but it’s getting entrenched. It’s really the one place where I can reliably send (information like receipts from Amazon or business) communication to you."
Read the entire article here.
Posted by brad at 5:05 pm on October 6th, 2010.
Categories: news.
 After identifying your priorities and managing your Inbox, succeed by focusing on your work rather than your email:

Open a Project Dashboard for one of your important projects. Avoid checking email and work on your most important tasks.

When you do check on email, group your Inbox by priority (View > Current View > ClearContext Prioritized by Category) and review only your highest priority messages (in red and green).

Use the MessageContext to see emails, appointments and other related tasks to get the full context for the item you are working on.
By completing the Identify and Manage steps previously, you are free to focus on the work that is most important to you while staying in control of your Inbox.
Tip
Only touch your high priority messages once. Even though you are glancing at these messages throughout the day, make sure that you act on any email you open.
For additional tips for using the ClearContext Daily Workflow, see the following blog posts:
Posted by brad at 11:18 am on September 1st, 2010.
Categories: ims, succeed.
 After you have identified the day’s priorities, twice daily (or other specified interval based on email response time requirements), starting with your highest priority email first, quickly act on each Inbox message or determine when you want to act on it:
Act Immediately?

Reply to the message if you can do so in a minute or two.

Delegate the email to someone else as appropriate.

If no response is required, review the message and file it to a Project folder.
Act Later?

Defer messages that you aren’t ready to deal with to a later date.

Create a task from email that requires further action on your part. Assign Projects to tasks as you create them.

Schedule appointments from messages that require a meeting. Assign Projects to appointments as you create them.
No action required?

Unsubscribe from mailing lists or long email threads that you have no interest in.

Use the Delete key to delete messages that you don’t need to keep for archiving purposes.
The end result will be a cleared Inbox and a prioritized task list, allowing you to focus on your work rather than your email.
Tip

As you act on email, assign a Project and allow ClearContext to automatically file the original message from the Inbox into a Topic folder.
Tomorrow: Throughout the day, succeed by focusing on your core work
Posted by brad at 11:07 am on August 31st, 2010.
Categories: ims, manage.
We recommend the following best practices for managing your workday with ClearContext:

 Identify
Start your workday by identifying what you need to focus on.

Review today’s meetings and appointments. Reschedule any conflicts.

Review your Tasks and Actions for the day in the ClearContext Dashboard. Adjust due dates based on task and project priorities.

Review overdue and pinned projects in the ClearContext Dashboard to determine which Projects require immediate attention.

Identify your highest priority messages so that you are prepared to manage your Inbox.
Taking this time in the morning will get your priorities in place to ensure that you have a productive day.
Tip
Before you move on to the Manage phase and tackle your Inbox for the first time, work on one or two of your most important tasks.
Tomorrow: Twice daily, manage your inbox…
Posted by brad at 11:00 am on August 30th, 2010.
Categories: daily_workflow, identify, ims.
The v5.1 release has introduced many new time-saving enhancements to the product. This concludes our posts of the updated User Guide.
By default in Outlook 2003 and 2007, ClearContext adds a single toolbar to the Inbox with the applications most-used functions. Add or remove buttons from this toolbar via ClearContext > Options > UI/Toolbar. This feature is not available in Outlook 2010.
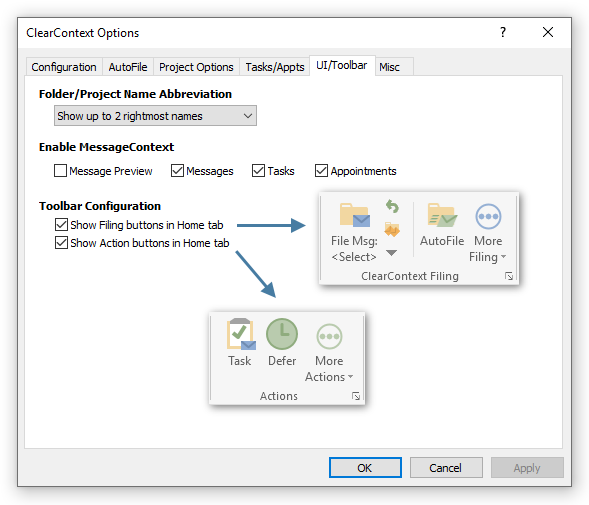
To add buttons to the toolbar, highlight the button name in the Available column and click Add. To remove, click items in theActive column and click Remove. Use the arrows below the Active field to change the order of the toolbar buttons. Reset All will put the buttons back in their factory default positions. You will need to restart Outlook for the changes to take effect.
Add a Second Toolbar
Add <START NEW TOOLBAR> to the active column to create a second toolbar. Any items that appear in the active list below <START NEW TOOLBAR> will be placed on a second toolbar. One caveat – the items marked "Drop Down Selector" must appear on the first toolbar.
Download a PDF of this User Guide here.
Posted by brad at 6:34 am on August 21st, 2010.
Categories: tips.
The v5.1 release has introduced many new time-saving enhancements to the product. We’re posting the updated User Guide over several weeks.
The Contact Exporter lets you create and export groups of email addresses found in messages stored in the Outlook folders you select.

Select the email addresses from a prioritized list of contacts generated for you to create an Outlook distribution list, Outlook contact records, or a CSV export file.
- Send a group email to people on your team – Select your work or team folder and create an Outlook distribution list.
- Create a party invitation for your friends – Select your personal correspondence folders and generate a list that you can send an email to or export to an online invitation service.
- Add all your business contacts to LinkedIn or your personal contacts to Facebook – Select the appropriate folders and create an export file you can upload.
To use the Contact Exporter:
- Go to ClearContext > Tools > Contact Exporter (Pro) from the main menu.
- Select the folders containing emails you want to export contact information from.
- The contacts found in those folders are divided into a list divided into three groups: More Relevant, Relevant, andLess Relevant. Use the selection links to select/deselect groups of those contacts or the checkboxes to individually select/deselect the contacts you want to export.
- Check the export formats you would like for the email addresses and enter names for the files – Outlook distribution list, Outlook contact records, or CSV file.
Import Contacts into Popular Websites
Once you’ve created the list, you can import these contacts into any services that accept CSV files. Here are import links for a few popular sites (log into the sites before clicking the links below):
Posted by brad at 6:32 am on August 20th, 2010.
Categories: tips.
The v5.1 release has introduced many new time-saving enhancements to the product. We’re posting the updated User Guide over several weeks.
Do Not Disturb disables all default Outlook notifications for new messages, including New Mail Desktop Alerts, changes in the mouse cursor, the envelope icon in the system tray and the default new mail sound.
To use this feature, select Do Not Disturb from the ClearContext menu. In the Do Not Disturb dialog, select the length of time that you would like to have new mail notifications disabled and click OK. When the time frame specified has past, ClearContext will re-enable message notifications. If you would like to reset your notifications prior to the expiration time, select Do Not Disturb from the menu again. Do Not Disturb will also reset notifications if you restart Outlook.
By default, the Inbox toolbar does not include the Do Not Disturb button. You can add it to the toolbar via toolbar customization.
Succeed
When you’re ready to focus on your projects, use Do Not Disturb to ensure that you aren’t distracted by incoming email.
Posted by brad at 6:31 am on August 19th, 2010.
Categories: tips.
The v5.1 release has introduced many new time-saving enhancements to the product. We’re posting the updated User Guide over several weeks.
The Email Activity Index provides an overall assessment of how effectively you’re managing your email and how heavy a workload you’re facing.

 To view your Email Activity Index, click More at the bottom of the Dashboard or selectScorecard from the ClearContext menu. A browser window will open, displaying your some basic stats about your email usage along with the ClearContext Email Index.
This score is an overall measure of how effectively you are managing your email communications. The higher your score, the better you are doing with email!

Excellent (80 – 100): great job at staying on top of email and getting a lot done!

Very Good (60 – 79): you are doing a good job at keeping up with email!

OK (40 – 59): you are just managing to stay in control of your email.

Warning (20 – 39): you are falling behind in your email communications.

Danger (0 – 19): Your email is getting totally out of control.
Your email effectiveness score is made up of three components:
- Response Time: This factor measures how promptly you are responding to emails. Getting back to emails that require responses within 24 hours will result in a good response time score. Use the ClearContext Daily Workflow to get through your email faster.
- Inbox Control: This factor measures how effectively you are processing the messages in your inbox. The more messages you have in your inbox and the longer it takes you to read, file, and/or delete messages, the lower your score will be. Manage your Inbox more efficiently with these tips.
- Communication: This factor measures how well you are doing at sending out messages and processing messages that require response/action.
Your workload score measures how heavy your email communication volumes are. The more emails you send and receive, the higher your workload score will be – and the harder it is for you to keep on top of your email! Review Top Five Ways to Reduce Email Traffic.
ClearContext Online

Register with ClearContext Online to see additional email usage metrics. After registering:
- Compare your stats with individual users
- Join groups to compare with colleagues
- Share your email activity index with others
- View additional, detailed graphs including responsiveness, effectiveness and workload
Posted by brad at 6:30 am on August 18th, 2010.
Categories: tips.
The v5.1 release has introduced many new time-saving enhancements to the product. We’re posting the updated User Guide over several weeks.
ClearContext allows the designation of a secondary message store (such as SharePoint Lists in Outlook 2007/2010, Public Folders, or an alternate Personal Folders file) as a secondary Project Folder repository for easing sharing of message conversations outside of the primary mail file.
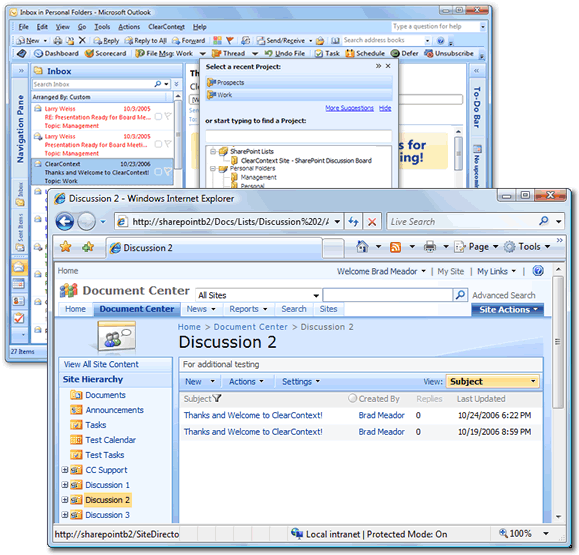
Designate the secondary message store via the Configuration panel and ClearContext will automatically convert folders within the data store to Projects. These shared Projects can then be assigned to message conversations and ClearContext’s file buttons will automatically move messages to the alternate location.
Configuring the Secondary Message Store
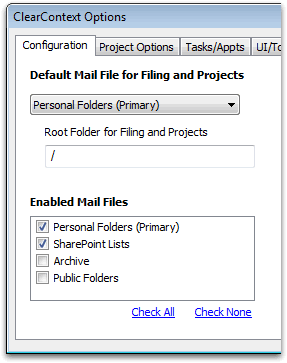
To designate a alternate message stores, open the ClearContext Configuration menu at ClearContext > Options > Configuration. After a restart of Outlook, ClearContext automatically populates the Project list with folders in the data store.
Select Public Folders to share to Exchange Server public folders. ClearContext will convert all Mail and Post public folders into Projects, while ignoring folders of other types (Contacts, Tasks, etc.). (Please note that in some versions of Outlook, the name for the public folders data store is listed as Microsoft Exchange Server).
Select SharePoint Lists to instruct ClearContext to recognize SharePoint discussion lists that have been connected to Outlook 2007 and greater. To connect a SharePoint discussion, open the discussion site in a browser and select Actions > Connect to Outlook. This feature is not available in Outlook 2003 and earlier.
Filing to a Secondary Message Store
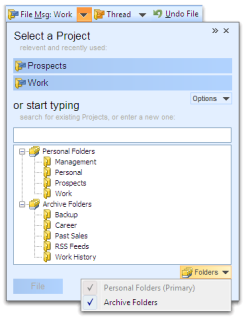
After a secondary message store has been added via Configuration, shared folders automatically appear at the bottom of the Project list. Shared Project assignment and filing then works exactly like Project assignment using primary Projects; assign a shared Project and all current and future messages in the conversation will be assigned that shared Project. Use any of ClearContext’s filing buttons to automatically move these messages into the shared message store.
Archive Mail Files
By default, ClearContext enables all open mail files as project folders. Remove archive folders from this list at ClearContext > Options > Configuration if you don’t file to them.
Posted by brad at 6:28 am on August 17th, 2010.
Categories: tips.
The v5.1 release has introduced many new time-saving enhancements to the product. We’re posting the updated User Guide over the several weeks.
ClearContext AutoAssign functionality lets you create rules to automatically prioritize and/or file your incoming email based on parameters that you set. By using AutoAssign, you can easily organize messages such as newsletters, business email, and personal correspondence.
Types of AutoAssign Rules
Create an AutoAssign rule by selecting the AutoAssign button by accessing AutoAssign in the ClearContext options menu. AutoAssign rules can be created based on any combination of the factors below. In italics, we have highlighted examples of the types of email messages that might be filed using these rules.
- Sender email or domain address – These parameters are used to execute a rule based on the email address or domain that sent the email. Enter multiple addresses separated by a comma. Designate emails from your boss with a project such as Work. Designate messages from a certain domains as a project such as Newsletter and automatically file them out of your inbox where you can read them later.
- Message is addressed to – This parameter can be used to apply a rule to an incoming message based on who the message has been sent to. Enter multiple addresses separated by a comma. Categorize emails sent to both you and your boss with project Management. Use Mark Important to assign a priority to messages sent to a business or private email address so these emails are automatically highlighted in your Inbox.
- Keywords contained in the message body or subject – ClearContext can search incoming messages for keywords that you designate. Designate an exact phrase or multiple keywords via the radio buttons above the rule. Set the project for regularly received emails with a certain subject (like "Order Information") to a project such as Receipts and automatically file these messages. Search for keywords such as a stock symbol or major client name and Mark these messages Important.
AutoAssign Actions
The following actions can be taken on messages that meet the criteria you designate in the AutoAssign rule:
- Assign to project – designate a specific project to be set for these messages. This project can be used to both identify messages by project in the Inbox and for automated filing.
- Assign Priority – assign a priority to these messages. This priority will set the color of messages in your Inbox.
- File Immediately – messages processed by the rule can be automatically filed to the designated project folder. This is very useful for messages such as Newsletters and Mailing Lists that can be automatically moved out of the Inbox into their own folders.
- Overwrite existing project – this forces the rule to overwrite the project on messages that are part of a thread with a previously assigned project name.
Managing Multiple Rules
The AutoAssign Management Dialog allows the user to create and maintain AutoAssign Rules. The dialog can be accessed directly from the ClearContext Menu (ClearContext > AutoAssign Management). Use the arrows on the right hand side of the window to move a rule up or down in priority. Once a single rule is executed against a message, the following rules are ignored. To execute all rules against the inbox, click the Apply Rules to Inbox button on this dialog.
Toolbar Customization
By default, the Inbox toolbar does not include the AutoAssign button. If you find yourself creating many rules, add it to the toolbar via toolbar customization.
AutoAssign Tips
Automated Rule Creation: To create an AutoAssign rule for a type of message (for example a newsletter that you would like automatically filed), highlight the email message, click the AutoAssign toolbar button, and the email’s parameters (address, subject, etc.) will be pre-filled in the AutoAssign rule creation dialog.
Posted by brad at 6:26 am on August 16th, 2010.
Categories: tips.